SIMPLY SOPHISTICATED DESIGN WITH A TASTE OF THE UNEXPECTED.

Tuesday, April 28, 2015

Some great quilt fabric!

Marny here…in the midst of hurrying to finish up all the details, quilts, pattern writing and printing, etc. that takes place before a wholesale Quilt Market. Here are two fabrics I am working with today. Just two you ask? Yep!
Take a look at this simply wonderful fabric from 
Alexander Henry's Folklorico group.
Every cut is different from the next.
It is a perfect example of how a single fabric can provide
the variety and interest of several different fabrics.

It is really fun to use fabrics that differ even more than this 
one across their repeat. Look for them in your quilt shops. 
Here is the selvage edge. 
Casa Azul by the De Leon design group with Alexander Henry.  
Also working with a yummy slightly coral pink from Art Gallery.
It has a wonderful "hand" and finish. Great fabric.
See how each square brings something different to the table?
Trimmings from blocks following our upcoming pattern!
We'll be sharing the pattern as soon as we can. Promise.
Gotta run and finish the quilt top!
till Tuesday…

Tuesday, April 21, 2015

LIne Process


jill here...Within the past few years, I've become a fan of works by Anni Albers.  She was a German American artist, working mostly in textiles and later in printmaking.  She studied at Bauhaus, Germany with many other modern artists, married Joseph Albers and together they immigrated to the US in the 1930s, prior to the war.  The Museum of Modern Art in NYC has a collection of her textiles and prints.

I'm intrigued with Alber's line work and it's applicable translation to quilt making.  The juxtaposition of the lines is interesting; some lines are sharp contrast, others subtle with their stops and starts.  I found the exploration of these lines similar to the designs in our pattern Torte, totally dependent on the arrangements of the blocks.  So when I made some blocks for " You Want A Piece of Me?",  I utilized some of the line work.

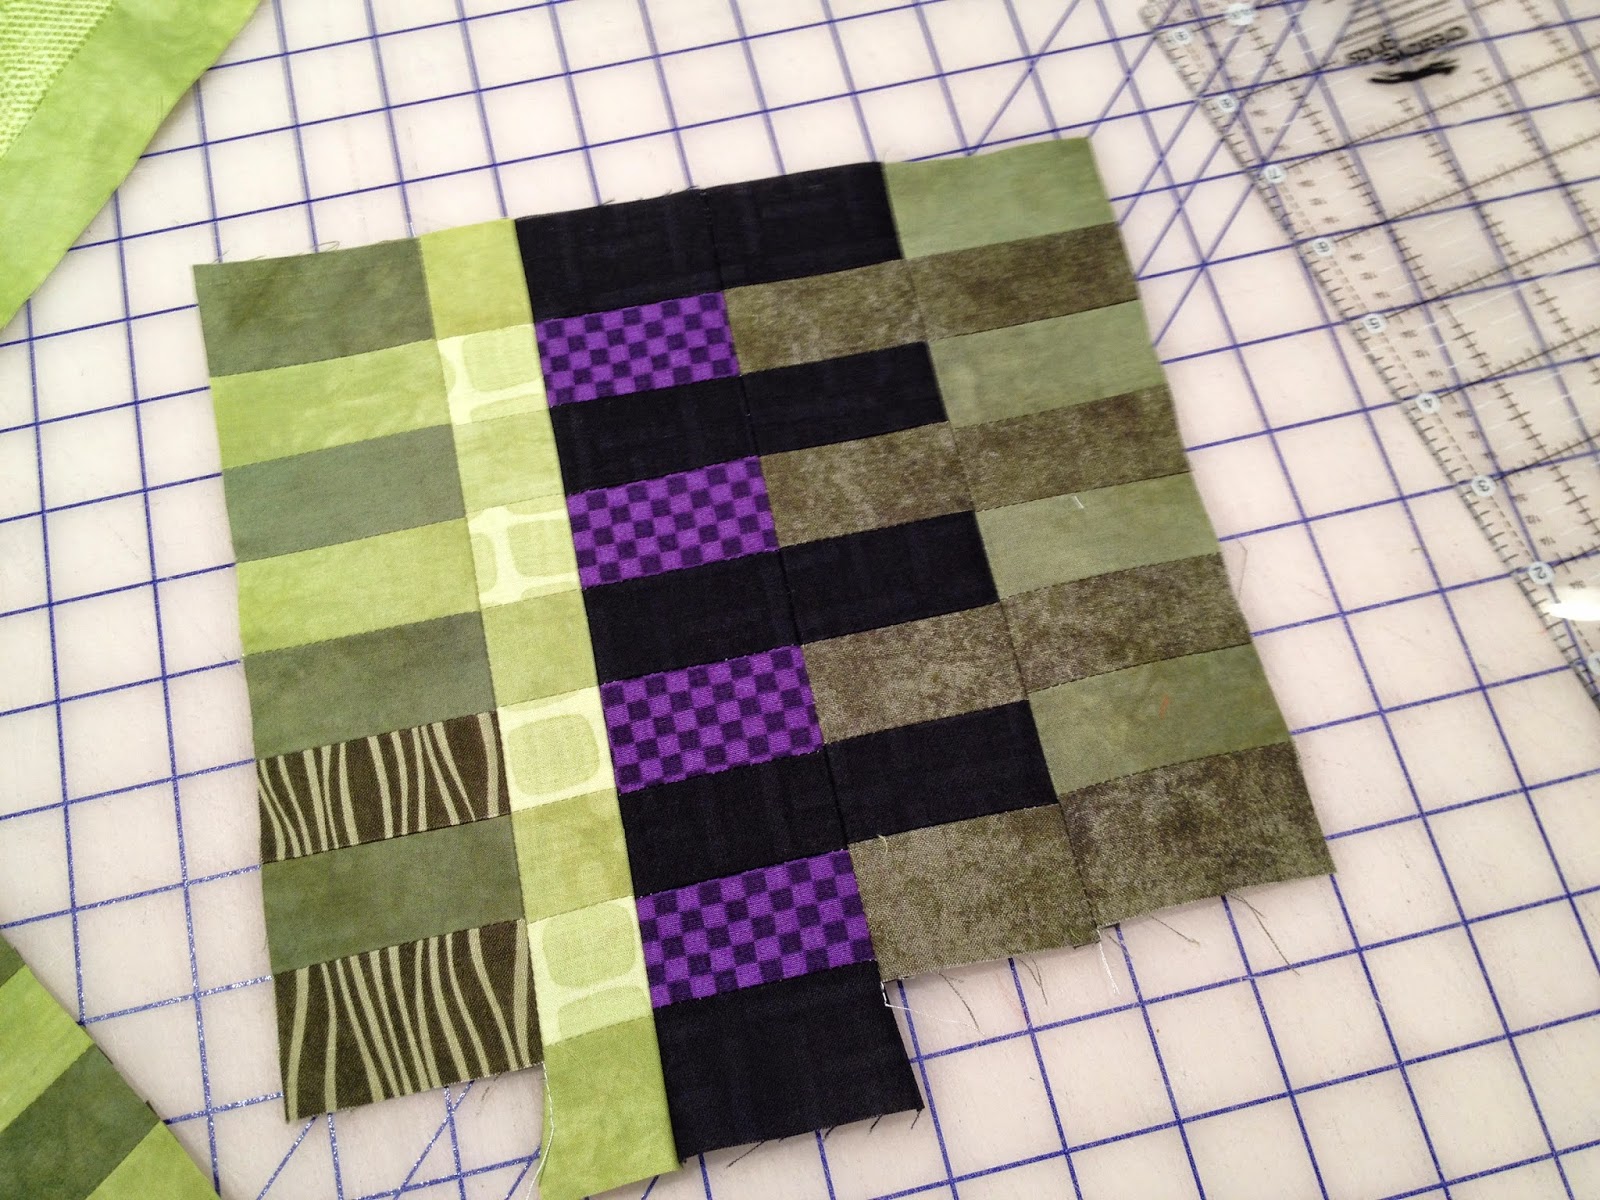
Size and Color were our challenges; one side of the block had to be 9.5" (unfinished) and the color was chosen by the recipient.  This first fabrication explored the color acid green.  I was lucky that Penny shared some of her private, hand dyed collection so that I could get it right!  We could add any other supporting colors to the arrangement.  So I thought I'd punch it up with some orange!

 As you can see from the pictures there was my usual flight of ideas!  I tested colors, values, direction, mix of solids with some prints.  If I were to experiment again, I would follow this recipe:


  • 1 1/2 " strips cut from a WOF / cut in half to yield 2 strips.  Combine it with another value or color to make a strip set of 4.  Four strips in a set are easier to work with as you can turn them either direction (to use fabric A on top or fabric B on top).

n

  • When you use one value, use it again in another combination.
  • Use  very dark and light values with discretion.
  •  Use very saturated, bright colors with discretion.

   
  • Maintaining a horizontal orientation, I cut 3 1/2" pieces.  I used this measurement because it was 1/3 the size of the finished block so seemed like an appropriate choice.....but later chose to cut a strip or two down to 1 1/2" wide.  Some were larger for variety.


Three combinations that utilize in common values.

Less is more...more was just too much for this small composition.


Getting closer to a pleasing ending.  I liked the strength of the black and I knew Penny would too.  It has a pleasing combination of values in an asymmetrical balance.  If I had a larger block, I might shift the values a bit but time to move on.
The finished block! 

This is another design attempting to use a variety of colors.  In this small composition, I had to edit.

Some transparency was achieved.  The balance was countered diagonally .

'till next Tuesday....

Tuesday, April 14, 2015

Creative Constraints at ISU Class

jill here...

Talk about fun and interesting!  Twice a week, sixty Iowa State University students explore different strategies and solutions in a Creative Thinking and Problem Solving class.  Most of the students come from the Apparel, Events, and Hospitality Management majors but there are a few from diverse disciplines.  One of the elements the class utilizes is guest speakers from diverse walks of life to share their strategies.  Last week we shared our creative components and how they apply to our design process and business model. We discussed constraints within our design/business models, showed some of our quilts and challenged the group with a design activity.

The activity challenge: to design within constraints.  Not wanting to influence their design thinking, we shared minimal information on a quilt block and showed them a traditional nine-patch (with nine patches, all equal in size, three different values).  They each had a paper selection of 3 values and a white sheet.  We asked them to create, by tearing the construction paper, another design. One resourceful student even had a pair of scissors in her backpack and yes, we let her use them!  The constraint was that they had to have nine pieces in the final composition and glue it down to a base sheet.  The time constraint was 20 minutes. The above and below designs are some that they produced.


Looks like there was some quilt influence.  We relished the positive feedback.  Several students said that their Grandmothers had made them a quilt.  Our designs were different from the traditional, perhaps inspiring some creative process.   They picked up on our comments about the importance of networking to find help and solutions!

Talk about fun and interesting...'till next Tuesday!


Tuesday, April 7, 2015

Quilt idea, hit or miss?

Marny here…

Pursuing an idea can be hit or miss (success or failure).

Remember this "block" created from charm squares? It got stuck in my mind. Questions started popping up. Wonder if these were made as true blocks and placed on plenty of background? Could I strip piece without waste? What about proportions within the block?

And then I thought of Nelson bubble hanging lamps. Take a look here to see what I am thinking. They look lovely hung together, but they are proportioned differently from one another. Hmmm. Is it worth trying?

Strip Set 1
Cut one dark line 1 ½'' x 21''
Cut two medium green 5'' x 2 ½''
To get started cut two segments at 2 ½'' intervals.


Strip Set 2
Cut one dark green 2 ½'' x 21
Cut two medium green 4 ½'' x 21
Cut one  3 ½'' segment for now


The three strip set segments stacked. It is blocky.
 Time to add "curves" and thereby reference the Nelson bubble lamps.


Cut four 2 ½'' squares of background.
Mark corner to corner on their wrong sides.


Stitch to either end on the pencil lines


Trim ¼'' from the stitching line. Note the correct side of the stitching line for trimming.


Trimmed.


Pressed open. Repeat for other 2 ½'' segment from Strip Set 1.


Seam to Strip Set 2 segment. In this picture it is the 3 ½'' segment.


Here is an 8 ½'' Strip Set 2 segment is used,
along with two 2 ½'' Strip Set 1 segments as before.


Hmmm. Not so sure about this.


Fiddling time.


Extending the line, simply vertical?


Extending the line as a path through the shapes?
The possibility is intriguing, but by no means a sure bet.
I really won't know if it is a success or a failure until I make more blocks and play around with them. And even if it is a "failure", the idea itself may payoff in the long run. Solutions sometimes show up way down the line when your mind is busy looking for answers to different questions. Or sometimes it is a "failure" that helped you understand or expand an idea. Trying is worthwhile.  

Till Tuesday…