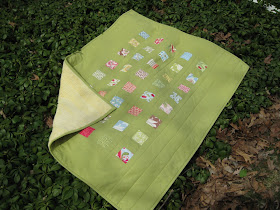
Inspiration for new quilts often comes from an idea you wish to explore with fabric. Sometimes the fabric itself suggests the quilt. We received boxes of prepackaged 2 1/2 inch squares from Moda at the Quilting Connection awhile ago. The little packets of color inspired a simple but striking contemporary baby quilt. I spread them out on a bolt of green Kona solid and they looked like spots of sunshine. Of course, 2 1/2 squares from your stash would work as well. While this little quilt has forty different fabrics, your quilt could have as few or as many as you would like. The variety was fun to work with. You could also take charm squares (prepackaged 5 inch squares) and cut them each into four 2 1/2 inch squares. The technique would also be effective in a tablerunner, placemats, or larger quilts.
The featured quilt was completed before our blog started so the photos within the directions are of different fabrics, but the technique used is the same. Generally fabric is prewashed before making a baby quilt. Since I did not wish to distort the precut squares I washed and dried the quilt upon completion. All seams are pressed open. I find the resulting flat look appealing.
The completed Lattice Quilt measures 32 1/2 inches by 41 1/2 inches.
Supplies:
One package of precut 2 ½ inch squares or 40 2 ½ inch squares.
1¼ yds of background fabric
1/3 yd of binding fabric
1 yd of backing if using a 54”or 60” fabric like the soft to the touch Striped Cuddle I used or 1 1/3 yds of 42” wide fabric.
Cut seven 2½ inch strips of background fabric. Three will be used for piecing with the 2½ inch squares and four will be “sashing.”


Sew the precut 2½ inch squares onto the strips of background, leaving space in between for ease of trimming. Press.
Using a design wall, distribute the colors and prints into five pleasing columns of seven rectangles each with the printed square at the top of each column. Join these rectangles together, pressing the seams open as you go. Add one of the remaining five 2½ inch squares to each column. Press.
Alternate background strips with the constructed column strips. Sew them all together. Press. At this point my top measured 18 ½ inches by 30 ½ inches. Measure your quilt and use your measurements.
Cut border strips from the remaining background fabric.
First, a six inch strip. Cut that into two 6 inch by the width of your quilt. Mine was 18½ inches. Sew the top and bottom borders onto the quilt. Press.
Second, cut two 8 inch strips. Trim to the length your quilt now measures. Mine was 42½ inches at this point.
Sew the side borders on. Press.
Cut four 2½ strips from your binding fabric. I used the background fabric for mine.
Quilt as desired and bind. I put binding on by machine. Wash and dry to make it baby friendly and soft.

Please join us next week. We will be discussing multiple interpretations of a commercial pattern.

Please join us next week. We will be discussing multiple interpretations of a commercial pattern.
Thank you.
Marny
Marny


Love the blog! I think it's a great idea to plan to post once a week. I will definitely look forward to Tuesdays. . .
ReplyDeleteWhat a great site. I'm proud to know you two. I'll add you to my to-do's for Tuesdays.
ReplyDelete