SIMPLY SOPHISTICATED DESIGN WITH A TASTE OF THE UNEXPECTED.

Picnic Tips

We are pleased to present Picnic.  
  • Six Modern Blocks
  • Block of the Month Compatible
  • Multiple Projects
  • Design Discussions
  • Unique techniques for cutting and piecing parallelograms
  • Detailed diagrams
  • Full color
  • 38 page soft cover book
  • Retails for $19.95
The cover shows the six blocks.  So many ways to feature parallelograms!


Back cover of Picnic.  Shows twelve projects, each featuring one of the six blocks in the Picnic sampler.

1/3/13
We've been asked about the fabrics we used to make the six blocks and the cover Sampler Quilt. 

We used Kona Snow as the background.
The Quiltcon Kona Colors: 
  • Azure and Cyan (used in Chips and Salsa block so they require the most)
  • School Bus
  • Lime
  • Candy Green
  • Tangerine
  • Chartreuse
  • Buttercup

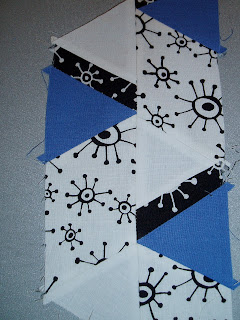
The "gray" and "black" are Benartex, Bold and Beautiful crayon stripe in white and in black.  Fabric designed by Michele D'Amore.

1/7/13
More about the 60 degree Triangle Ruler.  We hesitate to recommend a specific ruler but here are a couple. We used a Nifty Notions 60 degree Triangle Ruler.  The Clearview Triangle 60 degree ruler also works.  It is made by Alicia's Attic.  Most importantly, the pointed tip at the top and the lines that run horizontally below are essential to keep the cut at the correct angle.

Two important notes:
First, you need at least one pointed tip.  It is best to use one with a pointed tip at the top of the ruler, but you can make do with a single pointed tip by checking that your triangle ruler is absolutely level with the edge of the fabric.  This can be done with the 60 degree line on a straight ruler. 
  
Second, the Tri-Recs ruler does not work (ask us how we know).  You guessed it...we tried it and it isn't the right angle! 


3/18/13
HINTS FOR PIECING DIP BOWLS BLOCK (detailed in a blog post 3/19/13)

First seam in Unit A.  This is well illustrated and explained in Technique Six in Picnic.  Please note that at the bottom of the photograph the pointed tip of the slanted parallelogram fits into the spot where the offset square starts its slant.  At the top of the photograph you can see the other end of the slanted parallelogram reaches the sharp corner of the offset squared triangle right at the quarter inch seam line, leaving a perfect equilateral triangle of yellow showing.

Second side of parallelogram sewn.  Again note the stitching line of pink thread.  It is just like the earlier photograph above.


Unit B and Unit A ready to be sewn together.  See the yellow fabric that is purposefully remaining to the inside edge of each print fabric parallelogram.

Closer view of the inside edges of Unit B and Unit A

Unit A stacked on Unit B ready to sew a quarter inch seam.  The print fabric dog ears are stacked on top of one another and the yellow dog ears are stacked on top of one another.
This photograph shows that the needle is lined up at the quarter inch and about to sew right through the print fabric points.

Scissors pointing to pink stitches running through the print fabric points.


Please note the tidy point the yellow fabric comes to and the quarter inch of each printed fabric still showing at the bottom of the photograph.

Close up of the yellow point and the quarter inch of print fabric remaining below the point.

4/3/13
HINTS FOR PIECING CONDIMENTS BLOCK 

Marny and I are following up our Picnic with tutorials that will be helpful, just in case you run into a snag.  A couple of issues  have arisen with the Condiments block so I'll fast forward (and then we'll return in order of appearance).  These are issues that I did not incur while designing or testing so trying to recreate the challenge is challenging.

It would be good to run a test of this section of the block before proceeding with the entire block. Seam allowances, cutting and pressing practices could make a difference in how these intersections match up.

Cut and layout three box portions as illustrated.

When cutting the angles and sizes, pay close attention to the measurements.  I found that when I established my angle and added the second ruler to the left side (to allow cutting from the right), I accidentally added a very small amount to that measurement.  The reverse could also occur with subtracting just a fraction of an inch.  Just be aware.

I've arranged the "cuts" according to the directions, keeping in mind that these come from two different strip set widths.   Follow the measurements carefully using the appropriate techniques illustrated in the book.  This is just a section of the total block.  The issue of matching comes into play when the blocks are staggered.
 It's the staggered edge ( here in the center) that is the challenge.  Once these fit together, the other sides will sew into place as the match will be  more obvious ( triangle to triangle, lid to lid, box to box). You will only need to sew these two strips to test out the fit.

Sew these pieces together  as described in the directions,
maintaining the points and pressing open.
Once the two strips are completed, place them ride sides together  to determine the intersection match.

The pin on the right lines up directly under the matched intersection.
The pin on the left is short of the goal so we are going to punt.

The intersections don't align correctly so the adjustment is to decrease the larger "box" measurement.  In this case, there appears to be about a 1/4" difference so we will trim off 1/4" of the "box"...remembering that it will have to done to all the same sized pieces.  Disconnect the pieces very gently as they are bias edges, press and trim down.
Trim the piece the determined measurement (in this case, 1/4" ).
Resew the pieces together, press gently and place right sides together to check for alignment.
The bottom strip is below to show the match.
Align the edges, match the points, sew and press open.


So the fit of this staggered strip set is much better.  If the measurements on the test run are closer, they may be "eased" to fit but obviously, a 1/4" is to much to ease and it will be necessary to trim the piece size.

2 comments:

  1. Looks like a book I would love!

    ReplyDelete
  2. This is a great book of patterns! Easy to follow and fun to make! Thanks yall!

    ReplyDelete

We really love hearing from you! All comments are being moderated due to inappropriate comments being posted. We will attempt to post your comments in a timely fashion.