SIMPLY SOPHISTICATED DESIGN WITH A TASTE OF THE UNEXPECTED.

Tuesday, August 30, 2011

Dinner Plates Free Modern Quilt Pattern, Quilt Along, Sew Along Step 3

Marny here...welcome back everybody.  This is the third post of the modern quilt pattern, Dinner Plates.  The quilt along is open to anyone at any time.  All the posts can be accessed by clicking on "Dinner Plates" in the Label side bar.  Fabric choices were described here and the initial cutting instructions were posted here.  We'd love to see any fabric choices, your progress in making blocks, and, of course, completed quilt tops and finished quilts.  You can post your photos here please.  (You can always email us photos and we can post them.  Use the contact bar above to reach us.)

The Great Circle Cutting and Insertion day has arrived.
This is going to be fun!

We will discuss how to cut the circles, followed by how to cut the backgrounds in preparation for inserting the circles.  Then I will try to document the actual insertion process.  The techniques are also well described on Cheryl Phillips' site.  (Please note that her video shows going on to a Drunkard's Path layout.  Follow the directions that come with the ruler to cut the circles.  The video show the cutting for a Drunkard's Path.  Note where we align the folded fabric, not on the seam allowance line, but on the Fold Line.  Do not cut your inserted circles into quadrants.  We will be using them whole.)  I will be using her Cut-A-Round ruler.

The first step is to pair up the each circle fabric with its correct background.

Now we can begin.
Take one "circle" square.  
Fold it in half.  Finger press.
Fold in half again.  Finger press the folds.
Place the Cut-A-Round ruler on the folded fabrics.
The folded edges of the fabric should be under the "Fold Line" markings
on the ruler.  (Not the outside, 1/4" seam allowance marking.)
Cut along the 13" line with your 45mm rotary cutter.
Pull away the excess fabric.
And voila, you have a beautiful circle cut with fold lines showing.
Now take the "background" fabric that pairs with the circle you just cut.

Repeat the folding of the square as before.  IMPORTANT NOTE:  you will cut the "hole" in
the background one inch smaller than the circle you cut before.  
So I will be using the 12 inch marking.
Pull away the circle.
And voila, the background to insert your circle into.
Line up your circle, with its fold lines meeting up with the fold lines of the background.
Gently pull the background up and over the circle, and pin,
right sides together, at the fold marks.
Continue around the four fold lines, matching and pinning.
Now you can pin in-between your four pins.
Some of you might be most comfortable using a lot of pins 
And others of you will be happiest using fewer pins.
Ready to sew.
Stitch with a quarter inch seam.
Here it is coming out of the back of the machine.
Here it is sewn all the way around.
Press the stitching lightly.  Be careful not to press in any creases.
I started with the block facing up.  I pressed both thicknesses of the seam
allowance away from the circle.  
This is the completed block from the wrong side.
And here it is from the right side.  Perfect, and so easy to do!
Get all your circles inserted in the next two weeks.  On Tuesday, September 13th I will post Step 4, the final layout for Dinner Plates.

Couple of reminders before I go.  Jill and I are teaching our new Market Values pattern on Thursday, September 22nd at the Quilting Connection here in Ames, from 10-4.  The class is structured like a mystery class-you won't see the finished project till you are done.  Students will be sworn to secrecy, since the pattern is not for sale as yet.  $45.00 includes lunch and the pattern.  Call 515-233-3048 for more information, or stop in the store to sign up.

And, here is a repeat from the previous post.  On Friday, September 30th from 4-5 we are presenting a lecture/trunk show at the Des Moines AQS show.  Our talk is entitled "A Little Taste of Modern."  We'll discuss techniques, fabrics, design and market influences pertaining to the new modern. We'll explain a bit about the Modern Quilt Guild movement and it's influence on current quilting trends.  And of course we will show some quilts and help define some modern quilt elements.  There is a whole list of classes and lectures available in addition to all the vendors and quilt shows to inspire your quilting! Come check us out and we'll make it worth your while! 


So see you here in two weeks.  Let me know if you have any questions about Dinner Plates.  And we would love to see your photos! 

Tuesday, August 23, 2011

Cooking up Classes

jill here....Seems like fall is coming around the corner.  Our weather has been beautiful and much nicer to sew with all the windows open!  Sometimes when I'm designing, brain freeze occurs and I just have to switch to a less creative mode.  This weekend, baby quilts temporarily took over as there is somewhat of a time issue, they are happy and relatively small!  So I unearthed a couple from the unfinished pile and  brought them close to finished.  And the backings are the icing on the cake.....chenille and minkie!

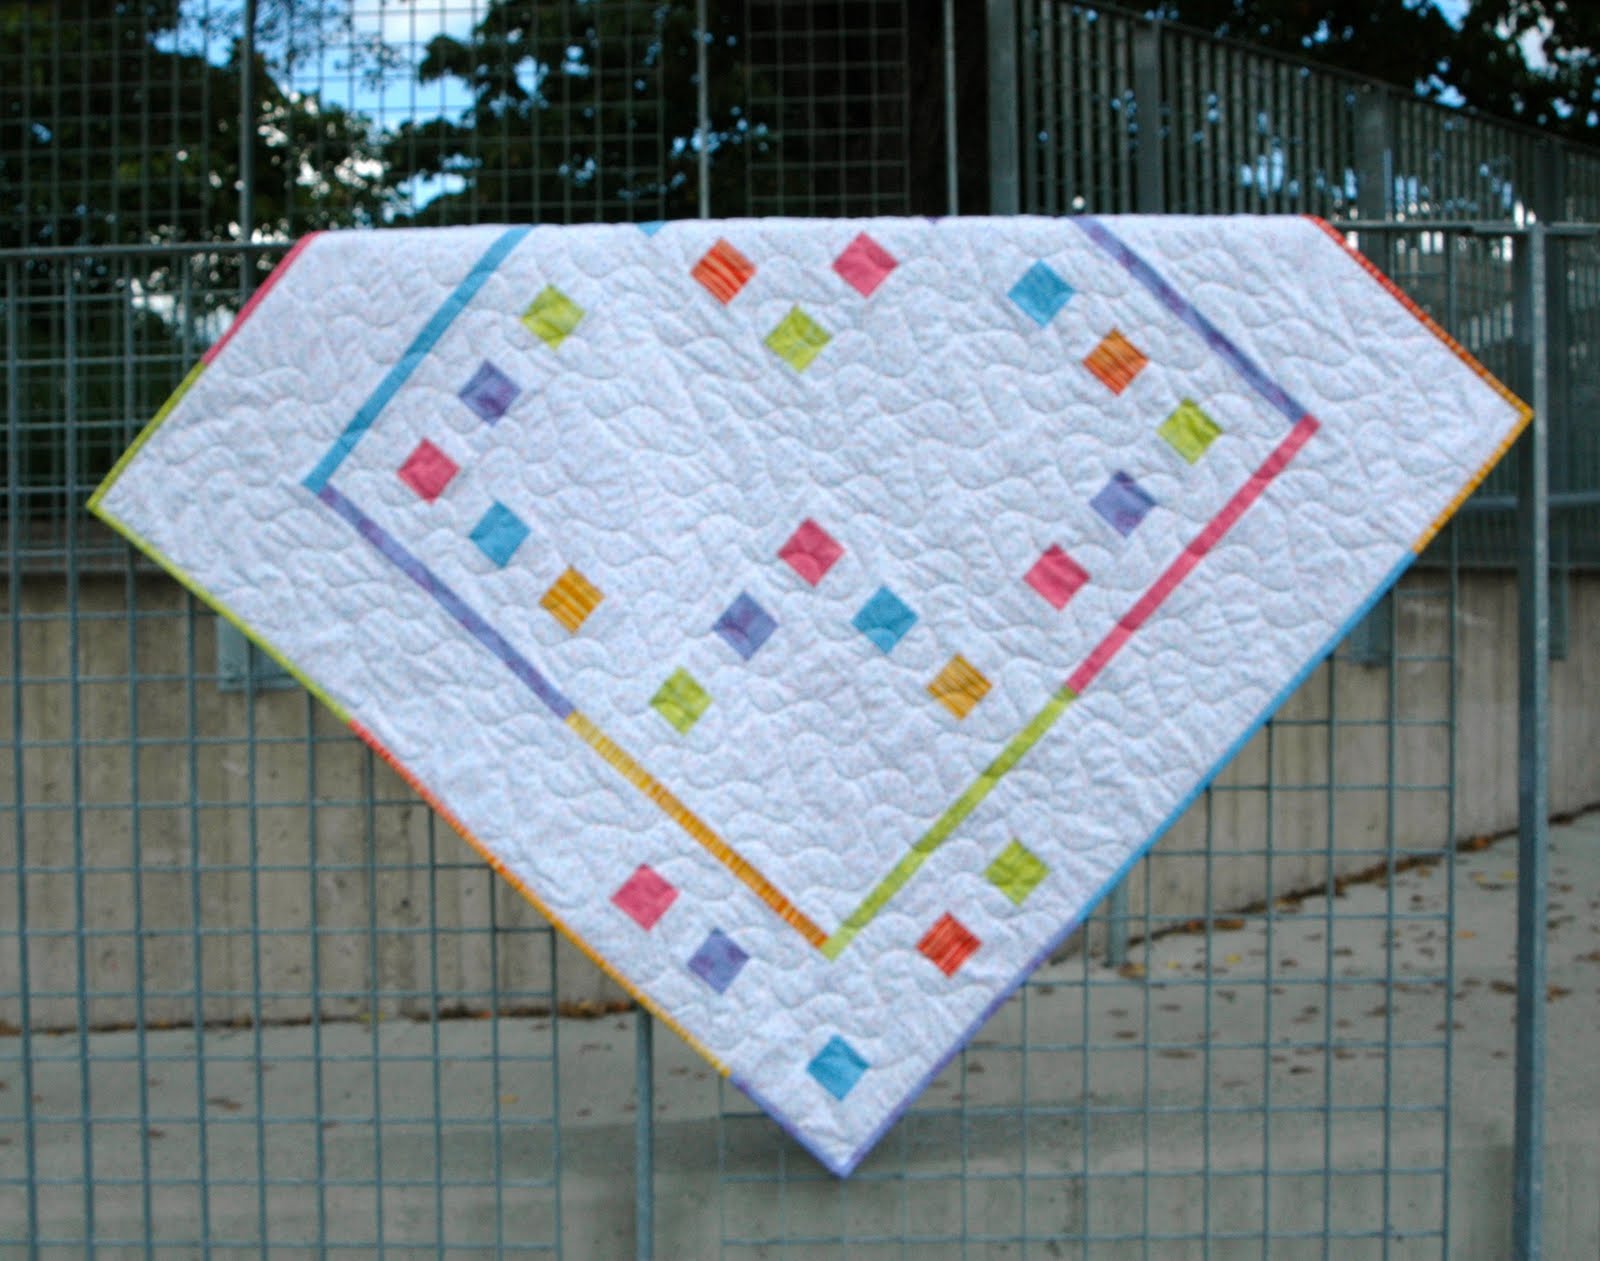
Staggered pastel squares bordered by diagonal dots and striped pastel
 chenille for the backing.  Just needs a quilting expert!

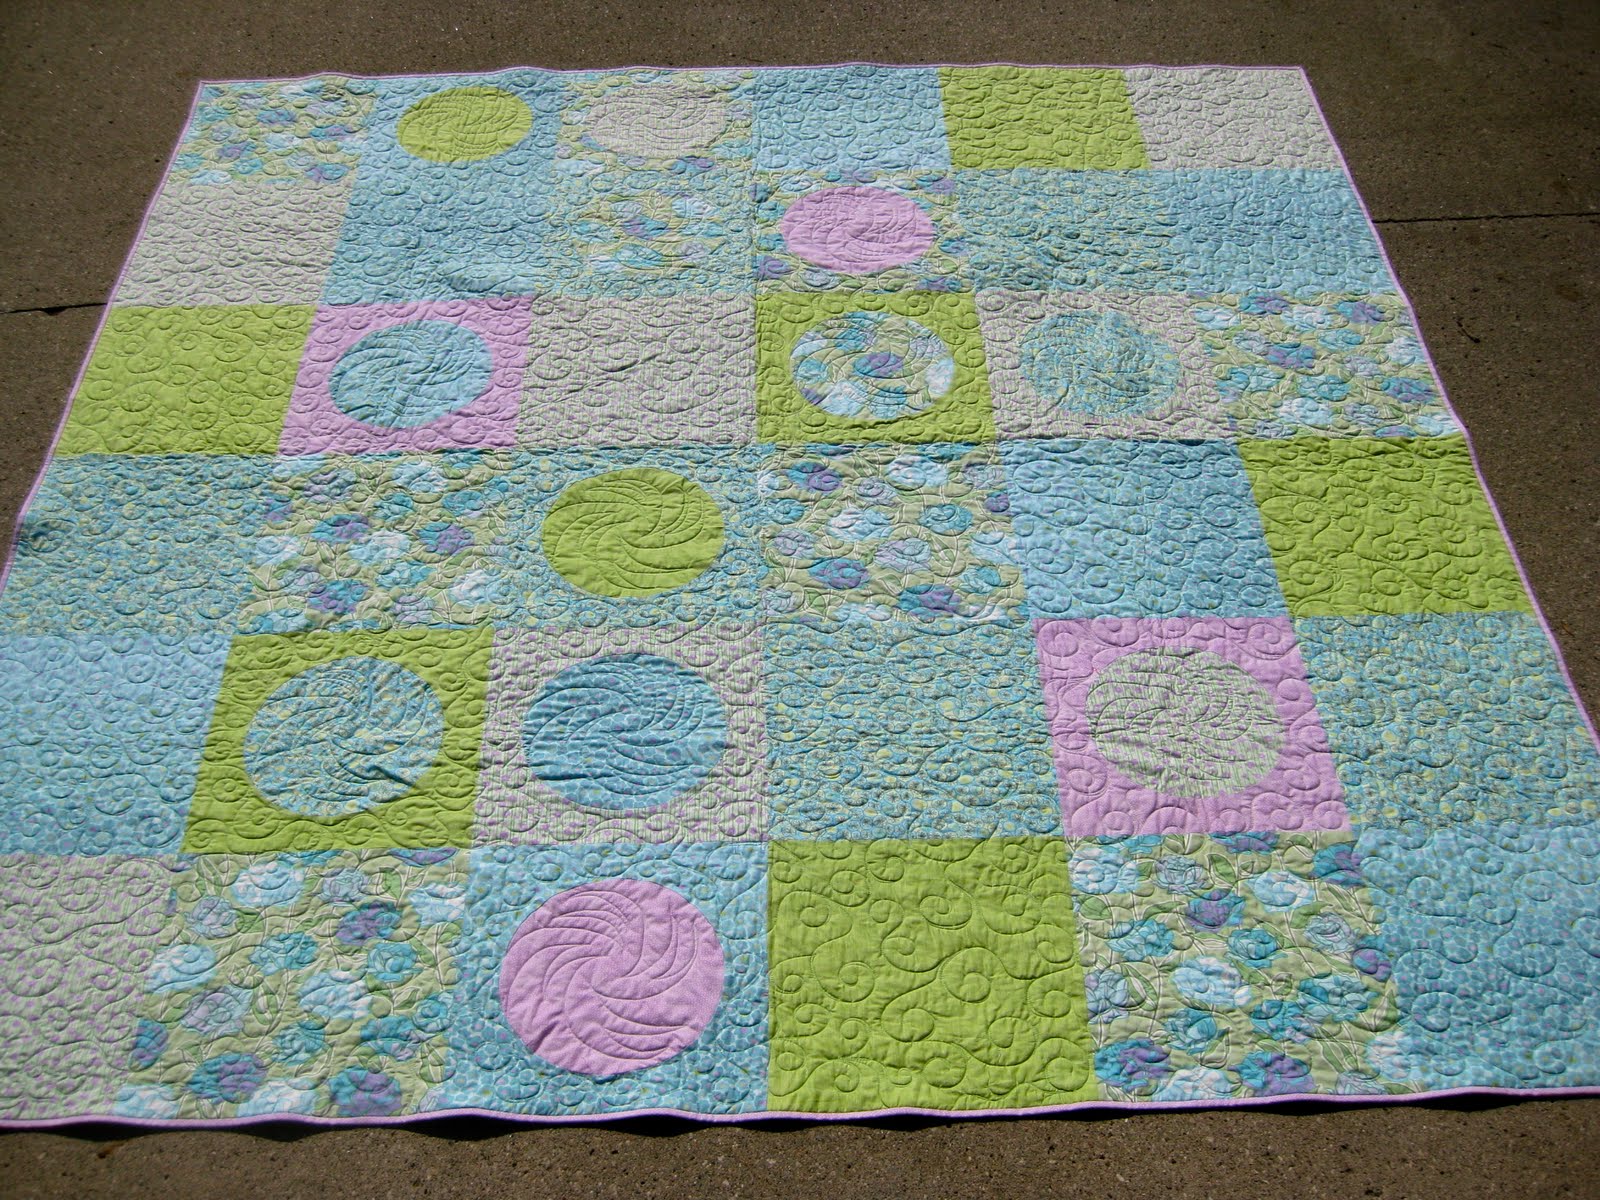
I love pinwheels!  This one is for the more sophisticated baby
.....minkie on the back!
I'll keep you posted as to the completion!

Now on to the mystery!  Kelly's test kitchen at the Quilting Connection in Ames (515-233-3048) is presenting our MARKET VALUES as a mystery class!   Spend Thursday, September 22nd from 10-4 cooking up our latest modern lap sized, gender friendly quilt.  The cost is $45.00 and we provide lunch. The fee includes our newest pattern which will be launched at the Houston market in October. You'll be our pattern testers, sworn to secrecy.  We'd love to have any of you sign up!

For the recipe you'll need eight fabrics-four sets of pairs.  The Quilting Connection has the specific amounts and some value guidelines to help the selection process.  You can contact our email with any other questions.  It will be both fun and easily achievable for a great holiday gift!

On Friday, September 30th from 4-5 we are presenting a lecture/trunk show at the Des Moines AQS show.  Our talk is entitled "A Little Taste of Modern."  We'll discuss techniques, fabrics, design and market influences pertaining to the new modern. We'll explain a bit about the Modern Quilt Guild movement and it's influence on current quilting trends.  And of course we will show some quilts and help define some modern quilt elements.  There is a whole list of classes and lectures available in addition to all the vendors and quilt shows to inspire your quilting! Come check us out and we'll make it worth your while!

This Friday, August 26th we'll be presenting a trunk show in the Dysart, Iowa.  The delightful Isabelle Originals and Ivy Threads quilt shop invited us to speak at 6pm.  It will be fun to meet new friends from Northeast Iowa.  Email Robin for info.


Onto the comments from our recent, very scientific survey....Again, we are most grateful to those of you who answered.  And not only did you give us some useful information, it helped us feel more connected to you on the other side.  So what if we have to use bribery!

It is no surprise that most of you are modernists, not totally throwing away your traditional roots.  Many of you don't choose to purchase patterns, which we suspected.  You are very creative and improvisational.  Then again, many of you are collectors of patterns and books; sometimes one or the other.  I can say that since I started designing, I certainly purchase fewer patterns and some books.  Part of it is confidence, the other is time (not enough to possibly make it).  There is sometimes reward in creating "what you see is what you get".  In remaking samples, I just follow the pattern and don't have to endure any brain freezes!  Patterns are more affordable, especially in these economic times.

As to the quilt pattern photography, it seems that flat out, total representation is the choice.  More options are better. You know that it can be fun to take a chance with your own fabric selections!  We recommend you try it and send us pictures of your vision.

Enjoy your week and check back next Tuesday for Marny's Dinner Plates quilt along circle instructions.

Tuesday, August 16, 2011

The Winner is...and Dinner Plates Free Modern Quilt Pattern, Quilt Along, Sew Along Cutting Instructions

The winner is.....  Bijoux Baby!  We'll be in contact with you to ship your fabric and patterns.  I do sort of have egg on my face as we really didn't have 100 comments but I'm telling you, it was just so good to hear from you!!  Thank you so much.  Your comments were so helpful and thoughtful.  Next week I'll give a full report as to what we discovered (not that you can't read it for yourselves).  Again, THANK YOU, we love having you comment!  Now, on to Dinner Plates!

Marny here...hope you all had fun choosing your fabrics!  New or old, playing with fabric choices is always fun.  I went with all "fresh" fabric.   My choices are described in the previous Dinner Plates post.

It is best to make a little chart assigning numbers to your six fabrics.  If you have chosen a scrappier look with half yard cuts or fat quarters you'll just need to pay attention that you come out with the right number of each of the cutting categories.  You'll see what I mean in a moment.

It is advisable to take the time to label your fabrics 1 thru 6.
There are three cutting categories.
1.  Plain blocks.
2.  The backgrounds you will insert your circles into.
3.  Squares of fabric you then cut your circle from. (Cutting the circles from these squares will be described in Step 3, on August 30th.)

Dinner Plates has 15" finished blocks.  Therefore the plain blocks are cut 15 1/2".  It is useful to cut the squares for background larger than 15 1/2" so that you can make them nice and square once the circle is inserted.  I advise 16 1/2" - 18" for this.  The squares for circles are 14 1/2" - 16".

This being said, you could now make the decision to make a slightly larger quilt with the fabric you already have.  You could make your blocks finish at 16".  Your Queen would then finish 96" x 96" and your throw would finish 64" x 80".  You would need to enlarge all the cuts by one inch to do this safely and easily.

Here are the cutting charts for Dinner Plates.  Be sure to follow the one for the size you are making!

So for this Step 2 of Dinner Plates all you have to do is cut numerous large squares. Large square rulers of just the right size are nice, but who has one for every size?

If you haven't cut large squares let me assure you it is easy.  I am going to show you how using two long rulers and then show how to do it if you don't have two long rulers but do have a variety of squares or smaller rulers.
The fabric is folded in half , with the selvages away from me.  Trim a clean, perpendicular edge.
Using two long rulers, align one with the required measurement on the freshly cut edge.
Lay the second ruler perpendicular to this, with the one of its straight markings aligned with
the folded edge of the fabric.  Remove the first ruler (the horizontal ruler above) and cut
along the right edge of the remaining ruler.  You will have a strip the required measurement.
I will show the next step in a bit.  For more on working with two rulers for general cutting go here.
Here I show using two square rulers and a long ruler.  I am cutting a 15 1/2" strip.
The first ruler I put down was the 12 1/2" square one.  Then I placed the yellow smaller
square ruler right against it and carefully aligned the clean edge of the fabric under
the 3" mark on the ruler.  (Yes, 12 1/2 + 3 = 15 1/2)  Then I put the long ruler along the left side
of the squares, making sure a line followed the fold of the fabric,
 removed the two square rulers, and made the cut.   
Here the resulting 15 1/2" strip has been turned on  its side.  The fold of the fabric is to the left.
Clean up the right edge.  (This will be the selvage edge.  Be sure to cut in far enough to
remove them both completely.)
Repeat with the two rulers or the multiple rulers.
And there you have it!  Beautiful squares.  Sorry that the angle of the camera causes my
squares to look deceptively like rectangles.  


Here are my three completed piles.  I've labeled them plain blocks,
 backgrounds, and circles.

This is the Cut A Round ruler by Cheryl Phillips that I use.  It makes cutting circles easy.  

Don't you just love the little piles the trimming pieces and scraps
form at the end of a cutting session?  See you August 30th for the great circle
cutting and inserting day!


Saturday, August 13, 2011

PLEASE, Don't Make Me Eat My Words

We  need your comments to give foundation to our analysis!  Please just tell us what you think by answering the  FIVE  EASY QUESTIONS.  Then you can go sew!  I'll be very grateful.  jill

Tuesday, August 9, 2011

Fabirc and Pattern Givaway for Five Easy Questions

Our Newest Patterns and A Jellyroll Givaway!


jill here... Okay Followers and Bloggers, sometimes we feel lonely.  We know you all are out there because we can read our statistical information BUT you don't always say much.  Here's your chance!  We've been making our latest samples to get our trunk show up and running.  Some of our second samples are the same as our originals, some we've changed up a bit.  If you answer the following five questions, you will have a random chance to win the "Wee Woodland" jelly roll by Keiki for Moda and all 4 of our newest patterns.  There needs to be at least 100 of you to comment or this won't fly (and then I'll have to think of something else).  Even our friends in the Ukraine, Australia and Venezuela are eligible.  Don't make me think any harder.  This is scientific research!


Yesterday we went searching for some interesting photography backgrounds.  The sun was not particularly cooperative and we weren't  able to set up the tripod so these are preliminary, but you can still get the picture (right?)!

1.  Do you prefer traditional or modern design?

2.  Do you buy quilting patterns?

3.  Do you buy quilting books?

Our newest baby NIBBLES presented flat out (and slightly out of focus).


Baby NIBBLES presented in a modern context.
4.  If you buy patterns, would you rather see the quilt represented totally "flat out" or would you prefer if     it had an artistic, not totally visible presentation?


BRIOCHE AND BAGUETTE punched up.


I bet you didn't know we had a beach in Ames!
5.  If you buy patterns, would you like to see more than one option on the cover?

 In order to be eligible, all you need to do is answer all five of the questions simply.  You can embellish your answers if you wish.   We'll announce our winner next week along with the cutting instructions for "Dinner Plates".  Stay tuned!


Tuesday, August 2, 2011

Dinner Plates Free Modern Quilt Pattern, Quilt Along, Sew Along

Marny here...Welcome everyone.  Yippee, we get to start today with choosing fabrics!

The steps to the quilt will be given every other week.  They will remain easily accessible in our sidebar under the link Dinner Plates.

Let me remind you what the completed Dinner Plate quilt looks like.  It is a queen size. Directions will also be given for the throw.  (The throw involves the same size blocks, just fewer of them.)


The sample quilt has a range of contemporary fabrics in soft pastels.  They combine to give a bit of a blended look.  It is soft and summery.  I might choose fabrics in a wider range of values (lights to darks) if they were available and did not take over from the pretty florals I started with.


I had fun in the Quilting Connection the other day choosing piles of fabric to represent choices that would be great fun to make up into Dinner Plates.  (If any of you are around the area I am sure the store could get the fabrics together for you, or a close facsimile, if you mention they are in our blog.)

First let's look at a grouping of fresh contemporary fabrics.
The white on pink polka dot is a Maywood, Going on Thirty.  The remaining fabrics,
left to right, are all Free Spirit by Dena Designs.  They are Kumari Garden-Sacha,
Leanika-Gemstone, Kumari Garden-Tarika, Kumari Garden-Sanjay,
and Kumari Garden-Jeevan.
Now look at a grouping of batiks.
The batiks range from blue into green, the picture shows a bit
more yellow in the green than there really is.  There is a variety
 of textures/patterns, scales, and hue.
And finally, take a peek at a cute grouping of Children's novelty prints.   This one is hard to resist.
The whales and the butterflies are Robert Kaufman Urban Zoologie by Ann Kelle.
The white with green polka dots is a Lakehouse fabric.  The tone on tone green
 is Moda Summerhouse by Lily Ashbury.   The multicolored dot on pink is again a
Robert Kaufman Dot Remix by Ann Kelle and the tone on tone pink dot is another
Robert Kaufman fabric called a Mixmaster Dot.


To summarize fabric selection.
A minimum of six different fabrics are required.  You can certainly have a scrappier quilt using half yards or fat quarters.  Try to have a range of values (light to dark), textures, pattern, scale and a pleasing color story.  All the fabrics will end up either next to or in conjunction with one another.  Most importantly though, HAVE FUN!!!

Cutting instructions will be posted Tuesday, August 16th.

So everybody tell your friends, pass it around, join in and let us know if you have questions or comments.  We love to hear from you.  

Till Tuesday...