SIMPLY SOPHISTICATED DESIGN WITH A TASTE OF THE UNEXPECTED.

Tuesday, December 28, 2010

Walking in a Winter Wonderland...

Marny here...This is what I get to look at today.  Our town is entirely frosted with ice.  The sun is shining and the skies are blue.  The effect is all that you could possibly ask for.  It will disappear before long, but it is magical while it is here.

This is our last post in 2010.  We've posted 53 times.  Seems hard to believe.  The weeks have flown by.  Modern Quilt Relish is happily growing.  We have enjoyed sharing our quilting and business lives with you all.  Your comments are always such a treat for us.  Please keep them coming.  We value what you have to say.
yum, a treat of a different sort


Jill and I wish you all a joyous and safe New Year.  
May you spend lots of time with the ones you love in 2011.

until Tuesday...

Saturday, December 25, 2010

2010 Basket Bonanza


Marny still...and that brings us to the twelfth year of Christmas amongst friends at Jill's house.  We made these wonderful fabric baskets just a couple weeks ago.  

Jill welcomed us with tasty hot cider and a beautifully decorated home.  We gathered around in the kitchen (of course) and chatted, catching up on one another's lives and sharing laughter. 

Next we chose fabrics, fused, cut to size, and sewed a few seams.  It makes it seem so simple when it is worded like that.  But it really is a few seams and the project is complete.  Another good choice for the sewing party group.    

Here we are concluding 12 Years of Christmas....
wondering what the thirteenth year will hold?

till Tuesday then.

Friday, December 24, 2010

2009 Not a Rocket Science Bag


Marny here...maybe you remember seeing this bag before.  We blogged and gave a tutorial here.  It really is a terrific project that Jill created.  This is the long/tall version.  The one illustrated in the tutorial and the blog post is somewhat shorter.

Some of you know we carried these bags full of lifesavers and blog handouts to advertise at Quilt Market in May.  Hopefully we can say hi here to some of the nice folks who checked out the blog following that  "gorilla marketing" attempt.  We appreciate your support right from the beginning.

Our sewing day started with Jill setting out her stash on her large cutting table.  Several color stories were stacked in pleasing piles.  Choosing multiple fabrics times eight individuals takes awhile.  The bag's construction is so straightforward we all blasted through to completion though.  The sewing group started a new tradition with this bag...division of labor.  Each station had an expert.  The bags came together quickly and were immediately found to be very useful.  It was a great project choice!

Year eleven and counting.

one more time tomorrow...

Thursday, December 23, 2010

2008 Pillowcase Prestidigitation


Marny here...2008 brought slight of hand on the sewing machine.  To produce this pillowcase you make an unlikely roll of body, accent piping and cuff, sew a seam, and then pull the whole thing through the tube you've created.  Magically you have a pillowcase!  It is a wonderful technique and the pattern is free with a pillowcase kit purchase at the The Quilting Connection in Ames, Iowa.

If memory serves, we chose our fabrics ahead of time.  It was just a matter of cutting large, simple pieces, making a few seams, and pressing.  This project makes a perfect gift for young or old.  Several of us went on to make multiples.  Again, we had lots of fun and a feeling of success.
We know Grandmothers that make one for every holiday for their grandchildren.  (or even every month) The kids request them even as the go off to college!  And now we all know how to make them thanks to the sewing party.  Very handy...


again tomorrow,

Wednesday, December 22, 2010

2007 Recipe Notebook

Recipe Notebook,
Easy does It for Friends, Nancy Halvorsen
jill still.....This is one of those projects that can grow; it brings me joy nearly every day!

I asked my friends to bring 6-10 of their favorite recipes in various categories, printed on an 8X10 sheet of paper.  An embellishment was the history of where it came from.  Some friends chose to share more than others.....  We slipped the recipes into plastic sleeves with binder holes and organized them into food groups.

For the notebook cover, I punted.  I chose the Art To Heart applique, and we decided on a title.  "Good recipes are like good friends, tried and true!"  The cover was lined (pillow case method), sandwiched with a layer of craft batting and had sleeves to hold the cover in place.  Upon completion, we all signed our names.  It is a great resource and now I have some family recipes all printed to hand to my kids.  It would be clever of me to do a similar family album for them!

This notebook took more preparation time but it is the gift that keeps on giving.

'till tomorrow....

Tuesday, December 21, 2010

2006, The No Complaining Bag

Humbug Bag, McKenna Linn for
A Quiltwoman.com Company

jill here...Back to the bags. This one is so much fun.  Even my daughter and her friends felt successful after making these totally useful, quirky bags.  They are the perfect size for a little gift, camera, change, make-up etc.

We used pre-quilted fabric.  Finding attractive quilted fabric is not easy but you could quilt a large square yourself, then cut it apart.  The embellishments are the fun part....beads, bobbles, bells, ribbons.  Once you've made the pattern, you'll want to make more.  They are just too clever!

Check out the Santa ashtray in the photo;  this was a  fun discovery from my parents stash of Christmases past.

So no humbug, laugh out loud!

'till tomorrow.....

Sunday, December 19, 2010

Full Body Apron, 2005

Apron, One of Martha Stewart's Designs

jill here....Back in the days before HGTV, I occasionally watched Martha Stewart.  She and someone famous made this full body apron, sort of like the kind my grandmother used to wear for her full day cooking experience.  At any rate, we chose yards and yards of fabric and made these reversible designs!  To be honest, they aren't very "body" attractive but they certainly do cover you up!  I went on line to find the free download and she has 79 options (probably better than this one).

The best part is they are gender neutral so you can hand over the cover to some other family member.  Hope your holiday kitchen is happy!

'till tomorrow.....

2004 Santa Shows Up

Marny still....Year six.  What to do?  Aaah.  Jill decided we were up for a new challenge. Applique.  Eeek!  Applique required a whole new set of skills.  But there is always that good lunch we get served if we behave so no mutiny from the followers.  There may have been some grumbling, but no outright revolution.

Nancy Halverson's Santa's Coming

So here are the results.  The group made Santa bags, Jill made multiple Reindeer bags as gifts, and I produced the pillow because I collect Santas and wanted a way to display him throughout the holidays.  Didn't we all do a fine job!

See you again tomorrow...

Saturday, December 18, 2010

2003 Five Years and Counting (or Drawing as the case may be)

Marny here....Year five we returned to bag making.  Jill opened her stash to the group and the fabric started flying.  Everyone needed two fabrics, and the choices were endless.  Once that all important step was conquered we cut, folded, pressed and threaded the cording and magically the bags appeared one by one.

This little sack like bag is called Drawstring Bag with Interior Pockets.  It was one of my first attempts at pattern writing.  See the very fine illustrations? :-)

It was a happy little project requiring little time and only two squares of fabric, add a little ribbon, and you were good to go.  Jill and I demonstrated it countless times.  We even taught it to an audience at a large quilt show in Central Iowa. 

The Jill and Marny quilting partnership was starting to take shape.  Who knew then how far it would go?

see you tomorrow....


Friday, December 17, 2010

2002 and Still Twisting....

Twisting Star Table Toppers, pattern by Carla Brinkman

Marny here.....It is year four.  Wow, this Twisting Star Table Topper pattern is still popular today.  It is one of those hardworking patterns that is written for eight sizes and shapes, looks good in a variety of fabrics and is addictive to make.  The Quilting Connection staff often refers to it as "a potato chip" pattern because you can't stop at one.  There is a mesmerizing construction technique circling the center multiple times.  We know quilters who have produced dozens.

This was an opportunity to try a Hoffman metallic large scale floral on black in the outer border and the center.  Paired with two values of subtly textured greens and a tone on tone cream it becomes very sophisticated.  The tiny black, cream, and gold check is one of our all time favorite fabrics because it adds a bit of zip without overpowering the lovely print.  (You just might find a bit of it still being hoarded in our stashes...)  Using the same geometric fabric in the inner border and binding generally works well.  It can be a stripe or a check or a plaid, but a little geometry helps those organic florals and riotous novelty prints often chosen for the center and outer border.  (This picture shows one that was constructed without binding using the sew and flip method.)

The sewing machines hummed, lines formed at the ironing boards and those seam rippers might have had a little "unsewing" to do, but each member of the group certainly felt satisfied to complete (eventually) such a lovely table topper in their choice of fabrics.

You need to understand that Jill fortifies us every year with incredible soups or mushroom lasagna and other delicious entrees.  We know if we keep at the sewing eventually the call to the table will be heard and heeded.  Eight of us sit at the table year after year and revel in the history of our friendships.  Thank you Jill.

till tomorrow...


Thursday, December 16, 2010

2001 Twisted Thinking

Japanese Twist Bag,  Lynda M. H. Faires
  Quiltmaker, September "01

jill still.....One of the best parts of blogging is that it pushes the mind to recall.   Details like time and place, recreating patterns and recipes  are easily forgotten if not documented.  To say this was our 2001 project is likely due to the date of the publication, but I can't be certain.

I know when I chose this bag for the group it was because it was smaller and attractive.  Sometimes sewing smaller is trickier....but we persevered.  The twist bag works great as a gift bag or jewelry bag and fits perfectly over a square box of  tissue.  And the directions come in two sizes.
 So, what seems to be easily remembered can get blurry.  It's a good thing I write an annual family letter at the holiday. Here's hoping the new year makes me a better historian.

until tomorrow.....

Wednesday, December 15, 2010

Second Year Ambition

Friendship Star Table Runner

2000, jill here.....Perhaps I didn't mention that each guest made their own project, customized to their interior or gift choice.  So after the first year's success, I chose a more ambitious table runner, a Friendship Star.  It was amazing to teach non-quilters about not nipping off the star points! And, of course, some took it more seriously than others!

This was a party and one hates to be a task master.  It is the holidays after all.   Chatter is far more important!

I had to take breaks to check on the food so Marny stepped forward to keep the project rolling. We had machines upstairs and down with at least a couple of pressing stations.  It was mass chaos with the fun factor.  At the end of the afternoon, the guests left with a nearly finished runner (or left it for instructor finishing).  A little binding and we were good for another year.

  Until tomorrow....

Tuesday, December 14, 2010

Twelve Years of Christmas Friendship

1999, Year One
jill here...One of the best gifts I ever gave myself was starting a holiday tradition.  Twelve years ago I invited 7 friends (some sewers, some not) to a project party.

I warmed up the cider as they arrived early on a snowy December day.  We chatted for awhile and then we attacked what I considered an easy wall hanging.  "Merry and Bright" (a free pattern available to quilt retailers) was our first endeavor.  We took a welcome break for a soup lunch and then attempted to complete the hanging or pillow in the afternoon.

The project took longer than that day to complete. What a surprise! The sense of accomplishment  was worth the challenge.
Merry & Bright, Designed by Susan Fuquay, American Quilt Retailer

The tradition of getting together has been repeated for another eleven years.  Join us daily in our celebration of "Twelve Years" of Christmas Friendship.

See you tomorrow.

Tuesday, December 7, 2010

Design Directions

Christmas Quilt from Successful Scrap Quilts

It has become apparent that we all have different ways to problem solve.  Some might call this divergent design directions; we get stalled and stuck on a project.  Marny and I have differnt approachs.

jill here....I don't know if I have a case of latent onset ADD where I am easily bored (or challenged) and start yet another project.  I do eventually return but there is a very large pile  of "laters", possibly "nevers".  Some would call this multitasking.

marny here...I am a plodder. One project at a time, not necessarily to completion, but I have to understand where it is going before cutting into the next pile of fabric.

I make lists in the morning of what needs to get done or remembered for my household--often those grocery and to do lists become a place for doodling and recording ideas in my head for my quilting life.  It is almost like the logical list making process liberates the flittering creative urges.
Even airplane napkins are fodder for my scribbles and organizing.  It surprises me how often the little pile of paper scraps add up to a successful quilt idea.  

jill here....A list?  That might mean a commitment.  Actually I do keep a sketch book (several, whatever is handy). I'm always anxious to cut into the fabric...I can only vision so much on paper. One approach to finishing is giving myself an actual number of blocks but usually it is a layout decision where I just have to keeping trying different solutions.  Sometimes I call Marny for a look-see, sometimes I have a glass of wine and fret.  Sometimes I go to bed and wake up with fresh eyes.
And sometimes, there is a deadline!

Marny again.  When excited by a new quilt design it is an interesting challenge to think in terms of how could this work for a new pattern.  Making a single quilt a single size for a single purpose is one thing, but making it work in multiple sizes and for different purposes is an enjoyable design challenge for me.  It adds another layer to those decisions that need to be made as the project moves forward.  All good for those gray cells.....

We're curious as to what you are working on.  Gifts? Long term projects?  Something fun for yourself?  Any suggestions on design approaches?  Please just comment and send a photo if you can!  Stay sane and warm, until next Tuesday!

Tuesday, November 30, 2010

Modern Quilt Stories Around a Modern Culinary Experience

Bridging from traditional to modern.......


Marny here....I will start with the story of a modern quilt.
Certainly an attentive audience here!


One year ago, during a visit to my son and daughter-in-law's home for Thanksgiving, we made a trip to purl soho.  I'd made the announcement that I was done making quilts from fabrics I didn't like or patterns without a modern aesthetic.  My sewing time and energy were limited so I wanted to only make quilts of interest to me.  I was excited to come up with a pattern for a modern couple!

12 Fat Quarters were carefully chosen for this event.  I'd assumed they would go for some modern quilt fabric designer's collection or bits and pieces of cool imported fabrics.  Surprise.  They chose Civil War reproduction fabrics and one little green solid.  I threw in some very toned Lecien dots for variety.

Their choices were certainly unexpected.  The design challenge gauntlet was thrown in my direction.  Was I up for it?  Months later, after considering a variety of directions, plaid spoke to me.  The right background finally showed up in Robert Kaufman's Quilter's Linen in the color taupe.  Their fat quarter choices would prompt the design of our pattern Leftovers.

The quilt arrived at their home three days before Thanksgiving--in time for me to see it in place during this year's visit.
And thankfully it was well received by the important occupants.
Full size photos of Leftovers in Queen, Throw and Crib can be found here.  The pattern can be ordered in the left side bar of this blog. :-)

Now for the modern culinary experience.
My son's passion for cooking and the resulting dishes he produces put mine to shame. 

The dark meat had been braised, the breast brined, the potatoes infused with truffle oil, the stuffing from wheat and white baguettes, and the corn casserole followed a friend's recipe found here(It is the recipe pictured and shown further down the page. The Tamworth Supper Club is a joint venture my son has with Derek.)
The turkey was carved,

the photos were taken,
and the feast of thanks began.  It ended with an incredible three layer chocolate and cherry trifle. 

So the moral of the quilt story and the culinary experience is that from traditional ingredients a fresh modern quilt and a delicious modern meal can be created and enjoyed!

Hope you all had safe travels and grateful hearts throughout the holiday.

Till Tuesday.


Tuesday, November 23, 2010

Thankful for Modern Quilts and Technology (sometimes...)

We wish you all a Happy Thanksgiving and a Safe Journey to those Traveling.

jill....On the intrigue list of modern design elements that inspire me is transparency.  Well executed transparency adds a level of sophistication, a sort of trick the eye phenomomen.  Our pattern Flatbread is a good example.  
Transparency really isn't that hard to execute and sometimes it even occurs by happenstance.  You can practice this technique with a simple nine patch block.   Pick one color in a light, medium and dark value (having them the same intensity helps).  A white 9 inch block background is also helpful.  Place a three inch strip of dark vertically through the center, add a 3 inch light strip horizintally through the center over the dark.  Cut a square over the shape where they intersect in the medium value; the colors have appeared to mix.

Recently, in a personal design challenge, I created the following examples:


This one is confusing, not really a value transparency since the light is in the middle of the darker purple and the medium red violet texture.

Okay... this one is not the truth but seems believable (medium and medium do not make a light) but there is a visable change in value.  The intensities are similar, the textures dissimilar.
This one is more accurate for value.  The textures are closer.
This will work more successfully once there is more of a purple line in the medium.

When I first started experimenting with transparency, Bill Kerr of FunQuilts offered this advise:  For best  results, make it large enough to see the intersection.  The colors don't alway have to produce the "truth" to create the effective outcome.  Good luck with your experiments.  Please share your pictures with your examples of transparency technique.

Ahhh,  our friends at FunQuilts just launched a new book.  Quilts Made Modern by Weeks Ringle and Bill Kerr have a perfect example of a quilt named "Tranparency".  Check it out!

Happy Thanksgiving wherever you are.  See you next Tuesday.


Tuesday, November 16, 2010

Flipside Scrapside

Modern Quilt Relish debuted at it's first guild meeting last night.  We were so pleased to be invited to speak at Fabricators' Quilt Guild in Gilbert, Iowa.  We shared the story of our young company and did a trunk show of all our quilts and patterns.  We enjoyed the whole evening.  Thanks for having us!

On to the flipside....

You make a quilt top and often you have leftover fabric, blocks, scraps, yardage...what have you.  The back of your quilt allows for a spontaneous and maybe frugal design option.  Go for it.  Here are some of ours.
In and Out, pattern by Amy Walsh of Blue Underground Studios
Flipside, design opportunity to experiment with color blocking and little windows.

Fun to use scraps in a free yet structured way.

Reverse of our published pattern, Brioche & Baguette.  One length of fabric combined with remaining blocks and leftover fat quarters makes a improvised and wacky back.

Vanity Square by Lorraine Torrence

This back is one length of fabric split combined with leftover blocks.  It makes a graphic statement.

We have also frequently used flannels and minkie on backs to make soft and cuddly quilts.   Thermore works well as a lightweight filling in this sandwich.  See it is all about food.  Fillings, sandwiches  and comfort.

So check out the flipside, 'cuz you know somebody will.

Send in photos you might have of the backs of your quilts.  If you can't use flickr you can email them to modernquiltrelish@gmail.com and we can post them for you.  Give it a try.  We'd love to see them.

See you next Tuesday.

Tuesday, November 9, 2010

Back that Modern Pillow Simply

Last  week we posted that machine satin stitched applique can be a tool for the you and your modern quilt.  Here are the promised easy steps to making a pillow back simply.  It only takes a few minutes to add a back to your pillow front.  Think of the great gifts you can make.

First you need two rectangles of fabric.  They can be two different fabrics as shown here, or they can be the same fabric.  One dimension will be the width of your pillow. In our case that is 12 1/2".  The other dimension is one half of the height of the pillow plus 3 1/2" to 4".  We used 4".  So half of 12 1/2" = 6 1/4".  Add 4" and that is 10 1/4".  So each of our rectangles measures 10 1/4" by 12 1/2".
Next, press 1/4" down to the wrong side along the width of the pillow. (The 12 1/2" side.)
Fold that over and press again.  You now have a folded edge with no raw edges exposed.  Repeat on the other rectangle.
Stitch through the folded edge on each rectangle. 
Place the two rectangles with the stitched edges next to one another.
It is now time to overlap the two rectangles.  They will not show equally on the back.  Plan which fabric you want on the larger top portion of your back and which you want on the smaller lower portion.  Overlap them as you want them to appear in the final pillow.  The rectangle on the top portion is placed over the fabric designated for the lower portion.  Both fabrics are right sides up.
When the above is turned over it will look like the photo below.  Pin this unit to fit the pillow top, right sides together.
Here is what it will look like from the other side of the pinned stack of fabrics.  In all photos the top of the pillow is at the top of the image.
Stitch all the way around the pillow using a 1/4" seam.  Press.  Trim the corners as shown below.
Turn right side out through the overlap and push the corners out with a point turner or the eraser end of a pencil.  Stuff with a pillow form.  Our pillow form is somewhat oversized giving our pillow a plump profile.    

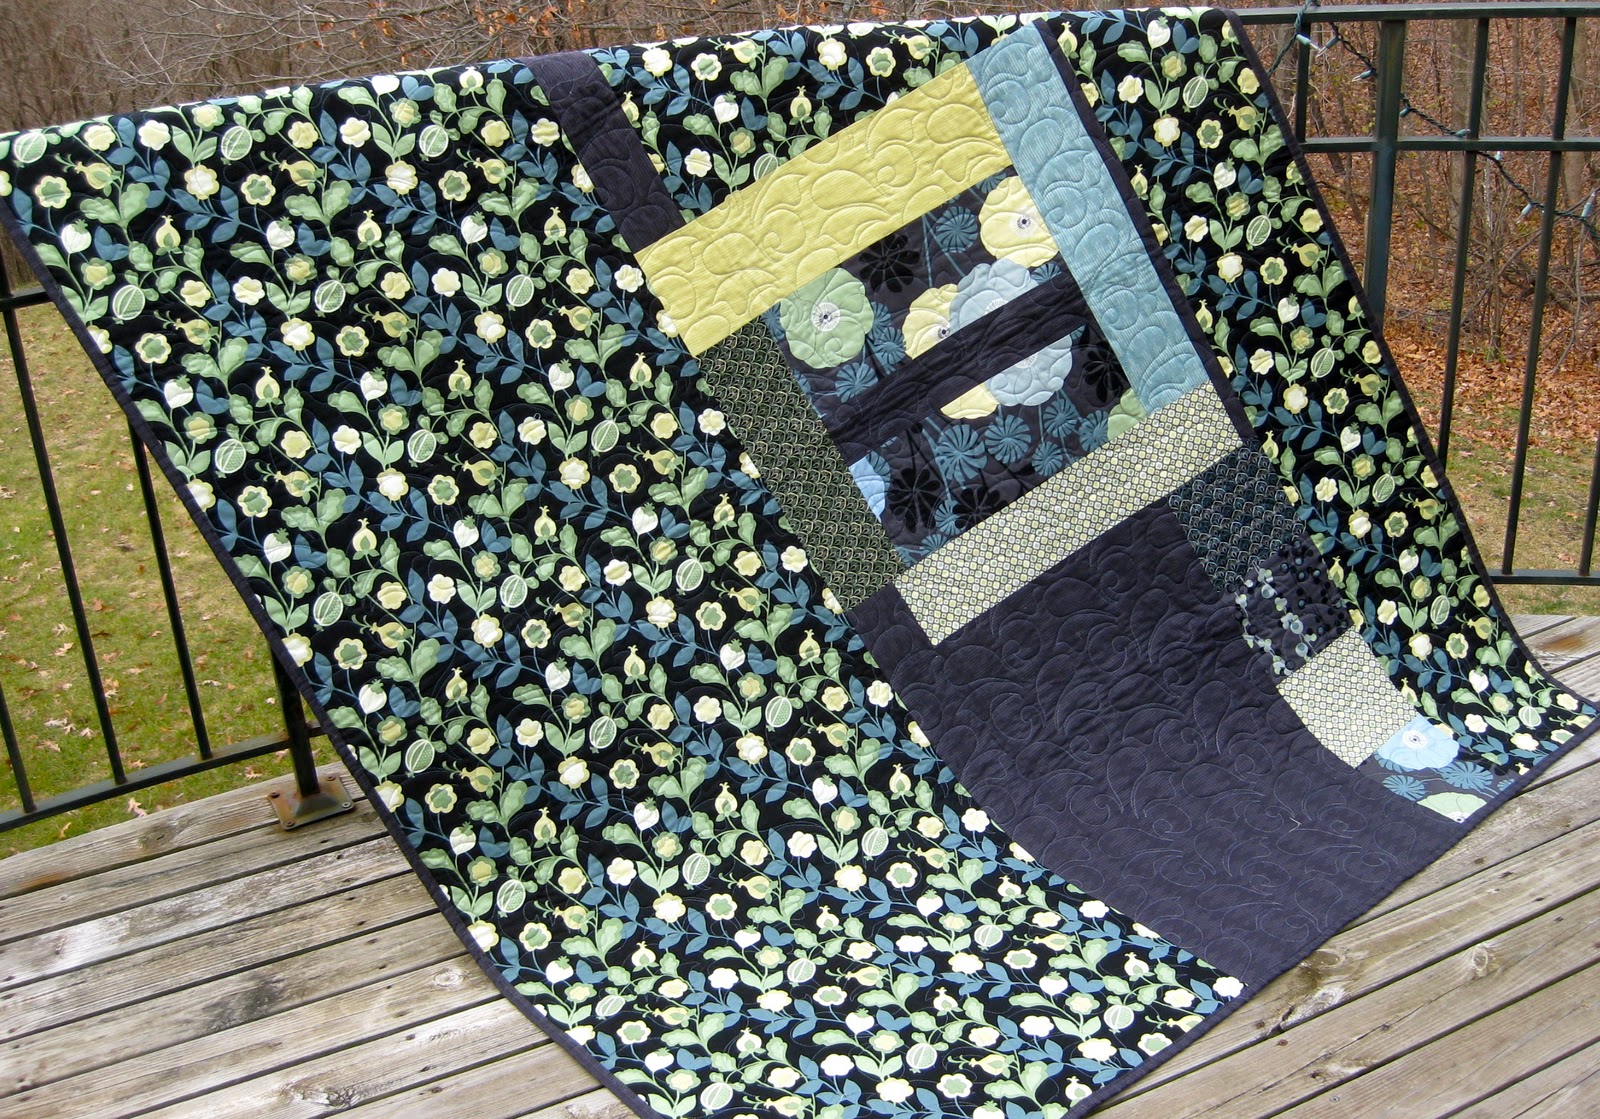
 Front side of the Modern Pillow

Back side of the Modern Pillow
Next week we are going to keep with the theme of backsides....hmmmm....
Till then.