 |
| Modern Pickle Relish is designed with citrus solids on a sunshine yellow background. |
SIMPLY SOPHISTICATED DESIGN WITH A TASTE OF THE UNEXPECTED.
Quilts for Sale
Tuesday, July 30, 2013
Pickled in Citrus
jill here.... In the midst of family and new designs, some new samples have emerged. This new baby is Pickle Relish fabricated in Cherrywood Fabrics.
Tuesday, July 23, 2013
Fresh ... and Still Not Rocket Science!
My daughter recently requested a bag that could carry the duties of motherhood. I added just a few features to make it easier to locate the cell phone and a front pocket for keys (or whatever). The straps were extended to distribute the load and take the weight off the top of the bag.
 |
| "Not a Rocket Science Bag" designed using some of the Zen collection by Bridgit Hegland for United Notions. |
Sew only the first fabric as instructed in the original tutorial if you want to add the cell phone pocket. Once this top fabric is in place, fold the canvas side out (inside) with the fabric strip at the top. Mark the 1/2" seam allowance on the outer edges. Determine the vertical center of each half; this is where the pockets will be centered vertically.
 |
| This is the padded cell phone pocket. |
 |
| Once all the strips are sewn, with the canvas still flat, hand stitch the pocket bottom to the canvas. |
 |
| This is the inside of the finished bag, sewn with black stitching....cream thread would be more forgiving! It would be nice to tack down the corner flaps. |
 |
| This is the plain side of the bag. |
Enjoy the day...'till next Tuesday!
Tuesday, July 16, 2013
Pillow Peace, the sequel to Pillow Fight
Marny here...last week's Pillow Fight is resolved. Peace on all fronts. I think the finished pillow is lighthearted and cute!
 |
| Completed pillow! |
 |
| Needs more of an interior frame though. The left and right sides of the interior unit look kind of lonely. |
 |
| Green border folded under to test. The Vespa fabric is happily the focus and the darkest fabric adds interest but does not overpower. |
 |
| Interior completed and oversized borders sewn on. They are oversized because the pillow top will shrink a bit with quilting. |
 |
| All the vertical quilting lines completed. That was so quick and so much fun why not run the quilt lines left and right too? |
 |
| The same techniques were employed, again starting somewhat in the center and working out to the edges. |
 |
| All the stitching completed. |
 |
| Seems appropriate to end now, with the light from the setting sun on the top of the pillow! |
Till next week.
Tuesday, July 9, 2013
Pillow fight in the workroom
Marny here...a story about a little project that failed. Hopefully I can share a more successful version soon.
 |
| The starting point is fabric from the stash and bits and pieces remaining after the baby quilt blogged here. |
 |
| Starting out I liked the balanced, but asymmetric direction this was headed. |
 |
| Just a little of the brown remains. The idea pops into my head to weight the right side and the lower edge of unit. |
 |
| Adding light above and to the left and medium to left and lower. |
 |
| Plan to trim to size |
 |
| See what I mean, it didn't work! |
 |
| So then I contemplated the addition of dark as a frame. |
And then it hit me. Simple is better. Hopefully I can show you a cute version next week.
Till then...
Tuesday, July 2, 2013
Des Moines Modern Quilt Guild show up in the gallery
 |
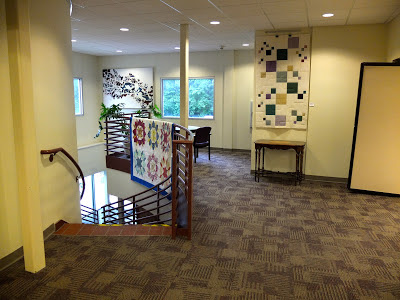
| Climb the stairs from the southern parking lot and catch sight of the quilt on the banister and then see Jill's quilt hung on the wall. |
 |
| Close up of Jill's quilt, Portion Control. The lighting in the foyer was not great for accurate, detailed photos. The colored fabrics are silk and they are set with a very interesting textured cream. |
 |
| Quilts hung in first circular room. |
 |
| More quilts and a bag. |
 |
| Close up of my quilt, Improv 9. Pieced improvisationally and sparingly quilted. |
 |
| Des Moines Modern Quilt Guild quilts along the curved walls. Such a variety! |
 |
| Another view of the quilts. |
 |
| Close up of Cafeteria Line, which we have discussed before, hung and lit. April West's quilting is so striking. |
Till Tuesday.
Subscribe to:
Comments (Atom)


