SIMPLY SOPHISTICATED DESIGN WITH A TASTE OF THE UNEXPECTED.

Tuesday, April 27, 2010

Intuitive Design Continues


Jill....It's Tuesday again--nothing like a deadline.  This past exploration is a work in progress, but I have learned a few technicalities along the way.

  • tighten stitch length
  • narrow seam allowances are good to curve, but if too small they do not press well to one side or the other
  • when sub-cutting your strip sets keep them relatively straight until making your curved cut with strips overlapped
  • give extra width on these strip sets for cutting curves and seam allowances
  • when planning strip sets, end and start with different fabrics, so when they are sewn end to end they maintain their variety
  • when joining two long strips together, it might be best to sew from the center out for better control of color placement
  • when joining lots of strips the shape of the piece gets wonky, oh well.

The strip sets were auditioned against three green fabrics. To differentiate the focus strip sets from the background, I decided to use four less intense greens in strip sets made from wider and longer pieces.

So this is a preliminary study, definitely different than imagined, a work in progress.  The current piece measures approximately 14 by 22 inches.

Marny....So I got distracted by the little leftover slivers from my first strip set.  They sent me in a new direction.  I had the tulle sitting on the work table, and suddenly it seemed like fun to try something tangential to my original plan.  (of course when doesn't that seem fun??)

First I placed the slivers of strip sets on the background and then minimally pinned the tulle on top.  Then I quilted through the layers trying to catch all the pieces.


Adding on was the only way to go from there.  Here again I used improvisational curved piecing.

I am continuing to add in a Courthouse Log Cabin style.  Wonder when it will end?

These piecing studies have proven valuable practice for a quilt I hope to make using the fabrics and embellishments shown in last week's blog.  The freedom of improvisational piecing is inspirational.

I am curious where it will take me this week.


Tuesday, April 20, 2010

Piece or Repiece, That is the Question


Sometimes you have to ignore the have-to-do's and make the time to be creative.  Since we have started blogging we have not had the time to follow our usual Tuesday explorations. Today we are back to playing....not expecting perfection, just trying something different.

Intuitive Color & Design, Adventures in Art Quilting by Jean Wells has been a recent inspiration.  After attempting some of the preliminary exercises awhile back, we decided to use her soft curve piecing method for today's exploration.


Jill challenged us with the following:
  • Identify some spring inspiration = a small idea for a petite work
  • Formulate a design orientation and focus
  • Choose 2 colors + 1 neutral and find a variety of values
  • How about some silk?
  • Bring one embellishment for another possibility....
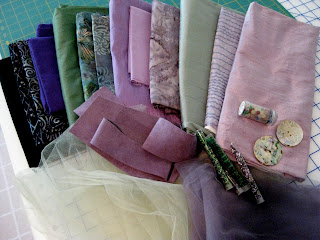
Here are Marny's choices:
  • Lilacs in spring
  • Multicolored units arrange diagonally
  • Grayed lilac with muted kelly green and black as a neutral.
  • yes I have silk (is 4 yds enough?)
  • tulle, ultrasuede, buttons, beads ...


Jill's choices:


  • Redbuds in park 
  • Horizontal format with focus in left lower quadrant
  • Fuschia and yellow-greens with grey to black as the neutral
  • yes to silk!
  • beads for embellishment


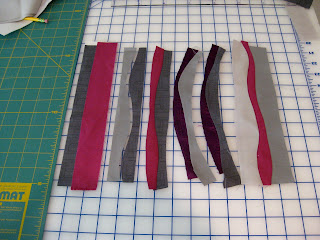
Jill cut strips of neutrals and fushcias 10-12 inches long by 2 inches wide.  Stacking two fabrics right sides up, cut a gentle curve through the center of the strips creating two pairs that fit together.  Matching the top edges, sew a very narrow seam, adjusting the curve as you sew.  Press to either side.
You can add a third fabric by stacking your new unit on top of a third fabric (right sides up) and trace the previous curve with your cutter through that third fabric. 


The following illustrates different value combinations.
Jill subcut these strip units into 1 inch pieces and randomly repieced to build her new unit.
 
This is a strip set auditioned with different greens and black to be competed for next week's blog.

Marny took one strip set of 7 fabrics and subcut with gentle curves from either end and repieced them flipping one 180 degrees.


Three units were created to be completed next week.

See you Tuesday....

Tuesday, April 13, 2010

Not a Rocket Science Bag


Just an easy way to use fun new fabric....and to be distracted from other endeavors.  Canvas is your foundation!  


Cut a piece of canvas 40" wide by 20" long.  Make sure it is flat and "squared" (I know it's a rectangle).


Arrange 5-6 fun fabrics in an order that is pleasing. It is helpful to have a darker fabric at the bottom of the bag (for dirt's sake).  If you want to use a fabric only once, divide the number of fabrics into the 20 inches and add another inch to each cut (for the 1/2" seam allowances) and cut the width of the fabric.  For example, 6 fabrics yields six cuts of 3.33 inches plus 1" seam allowance (which we rounded up to 4 1/2 inches.)  We wanted to use less of our whitest fabric and more of our cutest fabric, so we cut one 2 1/2" and the other 6".  We recut the last two strips as we approached the bottom of the bag.  You could always vary the size of every strip in any way you would like as long as the total adds up to cover the bag with seam allowances.  In this case 26 inches.


With a 1/2" seam allowance, sew the wrong side of the first fun fabric strip to the 40" top edge of the canvas.  Press the seam open and then fold the fun fabric to the right side.  This is the top of you bag.
Place the next strip of fabric, right sides together, matching the raw edges.  Sew with the 1/2" seam allowance.  Flip the fabric and press the seam down.  


Continue adding the strips until they are even with the edge (bottom of the bag).


"Square" up the rectangle, trimming to the shortest width.
We are going to make a french seam for the side seam of the bag.  Sew the 20" side seam with a 1/4" seam allowance with WRONG sides together matching the fabric strips as closely as possible.  Now turn the bag with the right sides together and sew that side seam again with 1/2" seam allowance.  The bag should be canvas side out.  With the french seam at one side press the back flat.  You will use the press mark as a landmark when you seam the bag bottom.
For the bag bottom, stitch from side seam to pressed fold.  Press the seam.  Pull the corners out, matching the bottom seam allowance with the side seam on the corner and on the fold.  Measure 3" from the point of the triangle you have formed, draw a line perpendicular, sew and trim to 1/2".  Turn right side out.
Cut 2 strips of webbing 26 inches long.  You can use fray check on the ends to keep them from unraveling.  If they are 100% polyester you can burn the edges to prevent fraying. Mark the top center of your bag with a pin.  Place the webbing 2 1/2" on either side of the pin and extended down over the bag 1 1/2 ".  Pin in place.  Stitch with a reinforced box stitch, as shown.


TA DA!!!!!


Tuesday, April 6, 2010

Commercial Pattern Springboard


Marny....We had the opportunity to attend Heidi Kaisand's retreat.  I had purchased the pattern Hot Shot by Debbie Bowles of Maple Island Quilts some weeks before.  I was intrigued with the asymmetrical six patches and the clever and simple construction method.  It seemed appropriate for sewing in a room full of distracting and cheerful quilters.  I wanted to make it without the borders seen on the pattern.  The edges are finished with a facing rather than a binding for a more contemporary look.


I had a couple of fat quarter bundles of Lonni Rossi fabric in my workroom that seemed perfect to use.  The flat green Kona solid was chosen because it provided a dark, contrasting texture to the other fabrics.  I wanted something to continue the analagous color scheme, but still make the squares stand out enough to seem scattered across the top.  The six patches control the variety of textures, colors and designs.  


                                      Ginko Leaves quilted by Connie Keller

Jill....Meanwhile,  at the same retreat, I was struggling with banners for a wedding reception.  I was working with silk and it was too much of a good thing. Lightbulb!  The pattern that Marny was sewing could work very well, using the silk as the 6 patches within patterned cottons.  The following photos illustrate two different uses.  One had different cottons with the same silks in each block.


The other arrangement involved the same cotton fabric background with a variety of random colored silks.
The banners were 2 blocks wide X 4-5 blocks long.  I added a silk border at the top and bottom and finished them by turning them inside out with the backing/batting.  I quilted (by machine) around the silk squares, added curtain rings in the upper corners and hung them with Command hooks.