SIMPLY SOPHISTICATED DESIGN WITH A TASTE OF THE UNEXPECTED.

Tuesday, July 27, 2010

Madness Moving On, Photographic Inspiration Challenge


The quilt top proceeded very smoothly.   A little rearranging and the first half of the quilt was ready to sew into it’s 4x8 layout.  The sewn half was then pinned with painter’s tape and hung up on the wall next to the design board.


It was playtime with fabric distribution again.


The browns ended up in every column and every row in a seemingly “random” arrangement.  The blues, yellows, pinks and greens are scattered throughout.   It will be a cheerful bed quilt in a happy yellow room!

Borders were added for two reasons.  My husband suggested, when asked, that borders would help to contain the cheerfulness of the quilt and secondly, they added a little length and width that will be useful.    The quilt will shrink up a bit with quilting and I want to make sure the result fits the bed.


Summer travel provides photographic opportunities.  This week we challenge you to upload one or two of your photographs to our Flickr site.  Please include a brief description of how this photo inspires your creativity.

 
This is a metal fabricated trash can that has gorgeous lines that might inspire quilting or beading.   They show such energy.

This is the front side of a set of stairs.  The risers are a mosaic of "agates" and the grey lines are the treads.   The rhythm is interesting and the textures are so opposite one another.  Fun to think about.

Meet here next Tuesday.


Tuesday, July 20, 2010

Circle Obsession


jill....From time to time, I become obsessed with circles.  I've made many patterns with Drunkard's Path, explored and taught Strips and Curves by Louisa L. Smith. The above quilt was a product of that class.  The biggest payoff with the curves is that they look more difficult than they really are.  (People will admire you for your technical abilities!)

Accurate templates are essential.  One very helpful product is Cheryl Phillips' "Cut A Round".  With this template, you can cut traditional Drunkard's Path blocks but the real benifit is that you can cut entire circles into whole cloth.  So if you don't want seams in your background fabric or circles, this tool is the perfect solution without doing all the math.

The templates come in varius sizes (small, medium and large) with complete directions.  The following photos show how easy this circle is to piece.

I chose a large scale motif and cut it 8" square with the finished circle to be approximately 6 1/2".  This gives me plenty of fabric.  The plaid background is cut 10" square so that it will be squared up after the piecing.


I pressed the fabric in half and then again into quarters, keeping in mind the center at the folded edge.


I'm cutting a  7" circle  (finishes 6 1/2") so I utilize the markings for a folded edge and cut it at the 7" mark.  The frame is cut one inch less so I cut it at the 6 " mark.


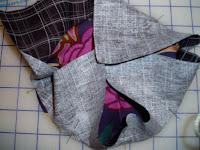
Following the instructions, I press the circles and the frame into eighths, place the circle on top. Bring the frame over the circle and pin the raw edges, matching the eighth markings.


With the circle against the bed of the sewing maching, sew with a very accurate 1/4" seam allowance.


I pressed starting from the back, seam allowance to the circle (to make it pop up a bit).  I then pressed from the front.  The circle was a little tight so I need to adjust my allowance and make my seam shallower.  Because I cut my background larger, I'm able to square it.  You might want to practice but it really is easy.


Have a good week!

Tuesday, July 13, 2010

A Method to the Madness

Marny......I have been working on a Pretty in Pink quilt from Heather Mulder Peterson's Livin' Large.    Sixty eight blocks are ready to fill sixty four spaces.  This is a good thing (now that the blocks are done) because it will allow me more flexibility in the arrangement.


Seventeen fabrics were chosen to start with.  The blocks come in two orientations.  So I have two of each orientation from each of the seventeen fabrics.  Hence the four stacks of blocks.
Lots of blocks.  Maybe you can see that the blocks are yellow, green, blue, pink, and brown.  The brown ones might become a bit of a problem for two reasons.  They are by far the darkest value blocks and there are only two fabrics used in the 8 brown blocks.  We'll see if they add or detract from the quilt.  Hmmmm.

And to avoid confusion between the orientation of the blocks I chose to place a pin in every block of one orientation.
So off to the design wall.  Mine is a 4x8 sheet of lightweight blue construction Celotex covered with Hobbs 80/20 batting.  One pile of each orientation will fill half the 8x8 block layout, leaving two extra.
So that is where I start.  Sixteen different fabrics are placed on the wall.
That was pretty easy.  Now I have to deal with repeat fabrics, and that requires a bit of caution.  You have to keep an eye out for particular fabrics, colors, and values so that the balance does not get thrown off.
 
You can see there are now 4x8 blocks up on the wall (and straddling the floor) with two left out.  The pinks in rows 3, 5, and 6 seemed to team up too much so I made a switch.
On camera it seams a bit green/yellow blocky but I am going to live with it for a bit and decide.  So far the browns seem ok, and will help direct the eye over the whole quilt.  But it is wise to live with the layout for a bit and return to get fresh impressions.

Some Tuesday real soon there will be a completed quilt top!
See you next Tuesday.


Tuesday, July 6, 2010

Flickr and Bubbles and more

Our Flickr site has opened, please join us.  Modern Quilt Relish Group Pool and Gallery is waiting for additions.  Using Flickr is free, as long as you have or establish a free Yahoo account.  There is an "add photos" button to click on.  It will walk you through the process.  If you use iphoto (and maybe other photo  organizing software) there is a button there to send your photo directly to Flickr.  You will need our url to do so.  http://www.flickr.com/groups/modernquiltrelishgallery/

We will welcome comments with helpful hints for people trying to use a group pool for the first time. 
You can also ask questions.  We will do our best to provide answers, or others can comment to help out. (please)

Here is Bubbles...
This sweet 42" square quilt is super easy to piece.  The 16 bubbles are six inch squares from 3 six inch width of fabric strips.   The sashing and borders are cut 4 1/2 " wide.   Ten strips would be plenty.
Here is a close up.
Have fun.

Again we are looking forward to seeing your pictures.
See you next Tuesday.