SIMPLY SOPHISTICATED DESIGN WITH A TASTE OF THE UNEXPECTED.

Tuesday, March 29, 2011

modern techniques, modern mistakes

 Jill here.....Remember last week's challenge?  The saga continues!   I thought I would be clever and use some previous tested ideas and incorporate them with a few new ones.  I had two blocks that were together - sew to speak.  This is one of them.

I proceeded to  cut the block into lots of smaller cubes and rectangles.  Looks like a mess?  It is.


I chose four interesting squares and tried several positions and decided that a dark sashing might be the best solution.  It would tie them together and then I would make the connection with the quilting.

Mock up  of the four pieces.

Actual block sewn together.
I squared the block and then added a pillow backing so that the edges were finished;
I added a layer of batting through the back opening and then quilted it.

Pillow backing to turn right sides out.

This is the disaster.

The problems were that the sashing was nearly the same size as the strips in the block.
You can't see it , but I pressed the sashing up when it should have been down.
Thirdly the strips didn't line up and they were too wacky to correct so the quilting
lines were skewed.  And, too many lines crossing in crazy directions.

So, I totally unsewed  the block, thinking I will make this right even if it kills me.
Well I'm here to tell you that it got the better of me.  Black thread on dark fabric
is not fun to take out!


Second and last try!

The sashing width was better but very technically hard to align with the seam allowances.
I did not pursue this experiment any further.


Perhaps another day when I am feeling creative, I will give it another try. Perhaps not. It might be happy with the others in the reject pile.

So if you would like to make me feel better, you can share your stories of frustration.  I'll be here!
Next Tuesday really should be spring.

Tuesday, March 22, 2011

the trouble with spring

jill here... I'm running behind.  Supermoon, the equinox and even daylight savings time do not add any more energy to my day.  And now that its spring, there is the "outside and inside".  I love spring but sometimes its just too much.  Then the IRS had to wreck a really good season and add TAXES!  Here comes the rain.  Better let the dogs in.

I'm longing to be creative, mostly because there are other urgencies.  I've been wanting to make a gift so I will give a "tried and true" little quilt a new version. Remember the fabric bookmarks that were cut and recut?  The following exercise is similar with a new combination of elements.

I started with 6 Asian and batik fabrics in a variety of color, scale, value. 

I cut large squares of each and stacked them one on top of the other.
Large sweeping curves were cut through all the layers.

One more counter curve was established.

The pieces were rearranged.
I made a plan as to the piecing order .
Using a scant 1/8" seam allowance and a tight stitch,
the deepest curves were sewn first, pressed to one side.

When sewing large curves together, repress intersections
(if necessary) so the seam allowances are opposing.
Pin the intersection and sew from the center to the outside.

Because of the sewn curve may be uneven, it will need to be trimmed.

These are four of the sewn blocks.  They look a little rough.


It seems rather disjointed - guess I'll have to pull it together.

I made a strip set alternating dark green and red.  I was going to create a "check"
but I lost my mind and made the strips uneven so....

The strip was cut into squares, alternating vertical with horizontal,
sewn together then cut at an angle.

Using a technique from Sandi Cummings' Thinking Outside the Block,
a stip will be added.
 This is a slice through the block in preparation for the strip.


One wacky strip was enough.  The second strip addition
was a combination of the cream with the dark green. I thought
it needed more light value.
The strips were pressed toward the strip to raise it up.

Another block with strip set cut 1', sewn end to end and then
the teal added as the second.

Block trimmed to 6.5"x10.5".

Second block trimmed.

So stay tuned (next Tuesday) to see how to finish the blocks into little quilts.  In the mean time, I'll try sorting out important from urgent.  Unfortunately, sometimes they're BOTH.  Have a good week and enjoy the coming of Spring.

Tuesday, March 15, 2011

Two rulers Rule...

Nature's gift for the Ides of March


Spring is such a hopeful time...full of so much potential.  Enjoy it.


Marny here...one more technique to share.  This one might be helpful to some of you who experience difficulty with cutting for one reason or another.  

I became dependent of this two ruler method of cutting when the store needed kits for a monthly program.  The 200 kits cut every month had 3-5 fabrics in each.  That is a lot of cuts.   The cutting counter set aside for this project could only be used from right to left and was unapproachable from the other side.  Shifting the fabric around that many times was out of the question.  

Now I am totally dependent on the two ruler method.  A single ruler sometimes baffles me, after all I have used the two ruler method thousands and thousands of times.  I am not picky (stop your snickering) about which rulers to use.  Two 24" long rulers are the easiest.  Today I am using my trusty 8" wide Master Piece 45 and an 8 1/2" wide Creative Grid ruler.

Here are the steps to cutting with two rulers.  Some, of course, are just the same as cutting with one ruler.

First, you need to establish a clean edge.


Carefully line the ruler up along the fold or the bottom edge of your fabric.  Cut perpendicular to this along the right side of the ruler.  Now you have a nice, clean and straight edge to work from.


I place my first ruler on the fabric.  My four inch mark follows exactly along the fresh cut.  I want a four inch strip.  When I am happy with the accuracy, I carefully place the second ruler snugly against the left side of the first ruler.


I pull away the first ruler.  And proceed to cut along the right edge of the second ruler.


And there you have it, a four inch strip.  No walking around or rearranging the fabric is necessary.   You can get quite a rhythm going.  Occasionally the right edge needs to be cleaned up again as you work your way along the length of your fabric.

Hope this technique helps some of you.  I find it very efficient and accurate.  We encourage you to use whatever method works best for you.  But you might like to try the two rulers, or have it in the back of your mind when some cutting challenge presents itself.  It works.

Visit this website for Heart and Hand Dry Goods to see our trunk show displayed and to check out their upcoming events--including their celebration of National Quilting Day March 17th-20th.

Till Tuesday....


Tuesday, March 8, 2011

Timeout for Tips

Marny here...First, here is a photo of the Cute as a Bug in a Quilt version of Leftovers, a Modern Quilt Relish Pattern.

April quilted it with a fun design and I got it machine bound and handed off to Jill.  It is part of the Trunk Show that Jill delivered to the Heart and Hand Dry Goods and Company in Sioux City, IA this past Saturday.  If you are nearby we'd love it if you could visit our quilts.  Let us know what you think.

Recently, I've happily completed two more quilt tops for one of our upcoming patterns.  Sorry, no peeking.

But while I was working on them the idea of sharing some random tips on quilt construction with you came to mind.  (Preparing quilts to be on pattern covers and seen by the public is a bit nerve wracking and demands a professional look so we do what we can to ensure accuracy.)  You might already be aware of these techniques/tips but here goes anyway.

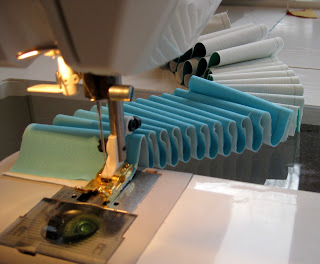
1.  Using an edgefoot for accurate 1/4" seaming.  The edgefoot is worth its weight in gold.  Oh wait, mine is gold.  Thank you again, Jeanne.

The edgefoot is often an accessory foot you need to purchase.  Once mine was put into use there was no going back.  The edgefoot has a little "gate" or "wall" on it that your seam allowance rides along.  My needle is in the 4.5 position to the right of center to get a 1/4" seam.  Test your machine for your best needle placement.

2.  When pinning your seams I have a couple of hints that help me all the time.   First, Clovers fine Patchwork Pins are wonderful for pinning accurately.  They are very thin and super sharp and cause the very least distortion possible.  Here is how I pin intersecting seams when both seams are pressed open.
Put the pin 1/4" in from edge and through the seam line of both layers.
Then pin through all thicknesses on either side of the first pin.   Remove the first pin.
The other thing I find helpful to remember when pinning two blocks, rows, or whatever together is to keep the edges perpendicular to the seam you are pinning square as well.  (That was a mouthful.)  This keeps the fabrics from distorting or twisting and allows for a nice, flat result.
The edge perpendicular to the seam is square.

The edge perpendicular to the seam is not square and will lead to trouble.


3.  Pressing each and every seam is very important.  First, set the stitches by pressing along your line of stitches briefly.

Steam is a must for me.  Second, press the seam open from the back side.

Third, press from the front side.

Quilters use the word "press" for a reason.  The back and forth of "ironing" can distort.  Press down gently and accurately.

So thanks for taking a look today.  Maybe you will find something helpful, and maybe you'd like to offer your own tip or technique.  Comments are always such fun for us!

Till Tuesday....


Tuesday, March 1, 2011

Plumped up - Scaled down


jill here....A short while ago we made a plan for creating more samples.  One of our patterns that has been more difficult to show is our Duvet Buffet.  It looks better with the comforter inside but is too bulky to hang and there isn't room for a bed in the quilt shop.  I've always liked those displays where there were miniatures of the actual product - just cute.  So..... I created 3 scaled down versions of the duvet.  The insides are finished just as the pattern describes.  They really look like a big TV pillow! (And could be.)

The pattern utilizes fabric amounts efficiently.  All the seams are finished and stitched down to make them laundry friendly (one of the perks for us pet owners who can't say "no").   And, its gender friendly, depending on fabric selection.  I've made it several times in "collections" of fabrics and batiks.
Reverse side with velcro closure
The reverse side can be a whole new scheme.  These fabrics blended with the front but in a more traditional style.

So here's to Buffets, big or small.  Starting Saturday, our trunk show is making its first out of town appearance in Sioux City, Iowa at Heart and Hand Quilt Shop.  In April, I'll be talking to the Siouxland Samplers Quilt Guild.  I look forward to meeting you.

Amazonian Insects, not bed bugs!


Until next Tuesday...