SIMPLY SOPHISTICATED DESIGN WITH A TASTE OF THE UNEXPECTED.

Tuesday, June 11, 2013

Riff on Recipe Cards, a Baby Quilt from the stash!


Marny here...just want to share my latest little project.  A baby quilt for a special little guy!

Last Thursday morning I got the itch to start and complete a baby quilt.  A little collection of fabric has been sitting in my stash for quite some time.  I ordered it from Monaluna fabrics years ago.  All three pieces are originally from her Monaco collection.  The circles and dots are still in that collection, and the scooters have been redesigned in a new collection.  

Rather than reinventing the wheel, putting a new spin on one of our patterns seemed like a fun challenge.  I love the table runner version of Recipe Cards.  The proportions are smaller than the child and throw sizes and suited the scale of my Monaluna pieces.  Luckily I had the three values necessary AND two yards of just the right green solid to dive in and get the quilt started!


This baby quilt is very different from the Recipe Cards pattern.  I didn't try to establish the diagonal seen in the quilts or the total symmetry of table runner.  This baby quilt uses a different layout.  I still wanted the illusion of layered rectangles though.  That is where the three values on a contrasting background comes into play.


The quilt completed. It is hard to see in this photograph, but the entire surface has been channel quilted.  I had never done it so extensively, and I learned some lessons along the way.  Even with my errors, I love how channel quilting looks!  The backing is a good quality flannel and the batting is Hobbs 80/20 fusible.  
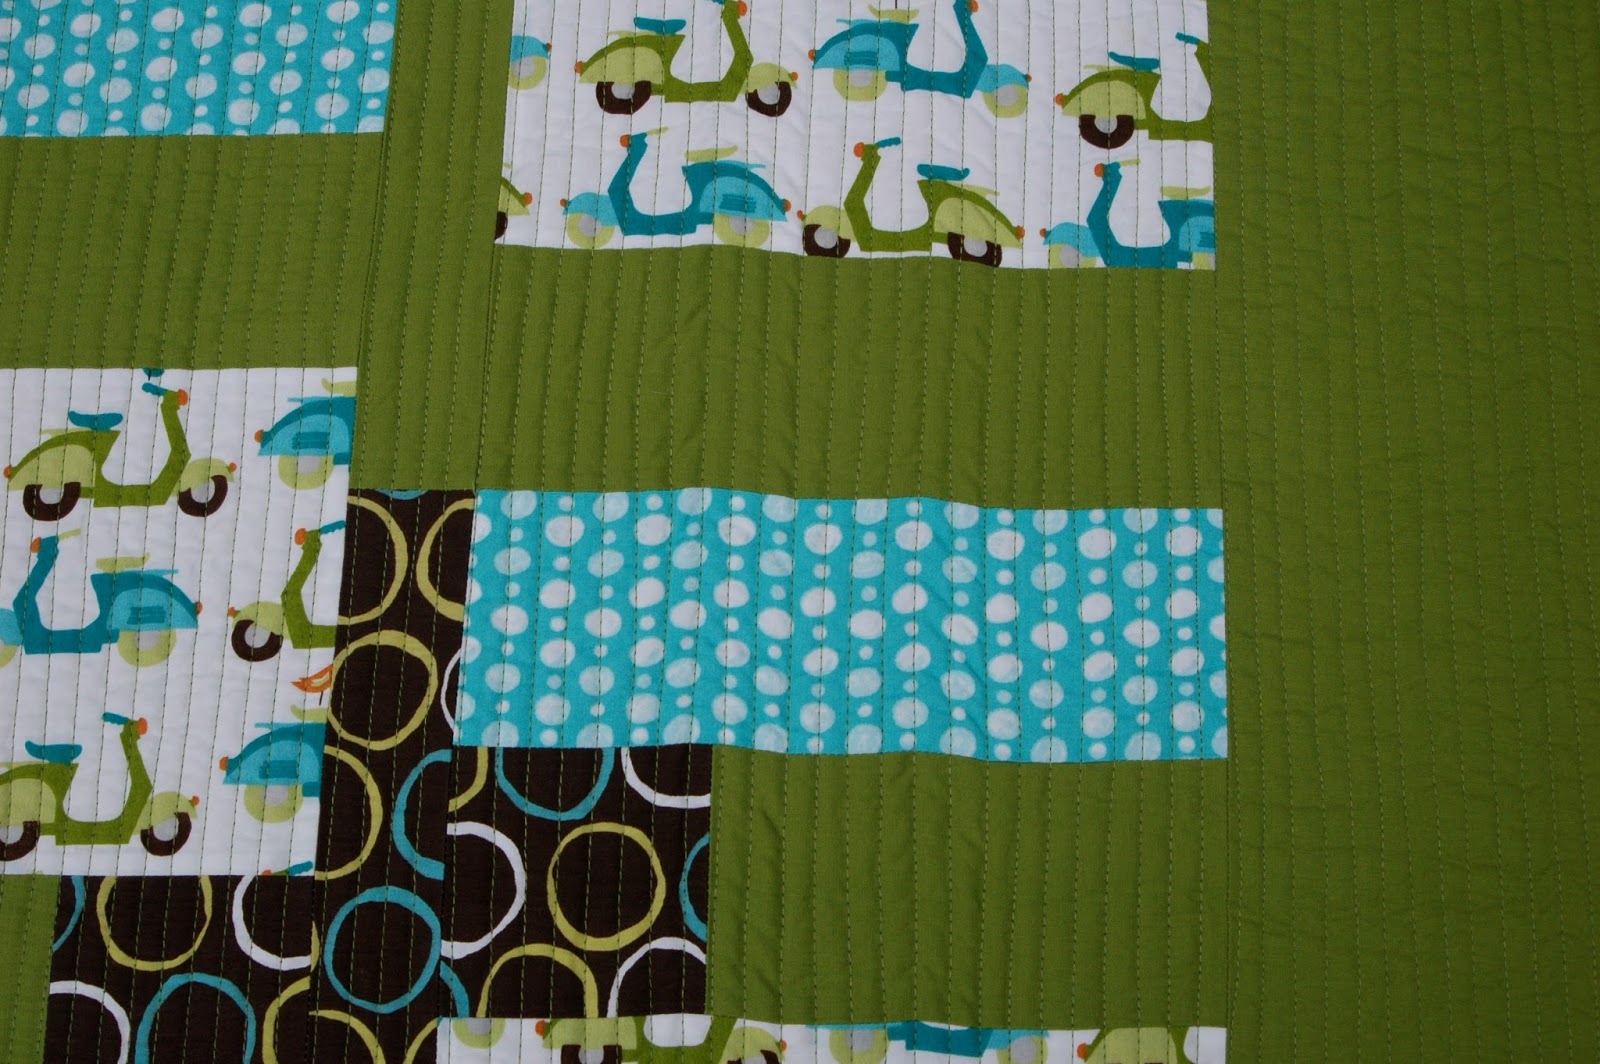
For some reason, quilting from top to bottom, followed by bottom to top seemed like a good choice.  WRONG.  Can you see how the edges of the blue rectangle almost seem scalloped?  That is because when you stitch one direction and then the other it becomes a "push me pull you" situation and the fabric distorts between the stitching lines.  The remainder of the quilt was quilted one row at a time from top to bottom.  I didn't aim for perfection, in fact I purposely made the channels slightly different sizes, but all are about the width of the pressure foot.  It looks purposefully not perfect. 
  
Another little hiccup in the process was the binding.  There was not quite enough of the circle fabric in the aforementioned stash to complete the binding.  Inserting the green to fill the gap makes the edge just a little bit more interesting!
 
Close up of green inserted.  And the diagonal ends seem to run opposite directions, another hiccup.  But the resulting trapezoid is kind of interesting in itself.


Room for yet another hiccup? In writing the blog and looking at the photos I also made a mistake in transposing the layout from the pattern, oh well, it is still balanced, but not quite the way I intended.  I should have drawn it on graph paper like I usually do, but I was having too much fun pushing ahead with the fabric.  I actually cut the correct pieces and then decided they were wrong and "corrected".  Silly me.  Luckily the quilt still works and makes me happy!


Till next Tuesday...

Tuesday, June 4, 2013

Winners and the Des Moines Modern Quilt Guild Charity Block

Marny here...the winners of the Moda Layer Cakes were chosen using our random number generator. "Oink a Doodle Moo" by Jenn Ski goes to Doris and "Snap Pop" by Sandy Gervais goes to Deb.  The winners have been emailed.  Congratulations to our winners and a big thank you to all of you for your comments.  We loved reading and learning from them.
Three Herringbone blocks.  The left and right were made by Jill and the middle one is the one I made and is referred to below.

Jill and I are members of the Des Moines Modern Quilt Guild.  We are both participating in the Charity Quilt project for Hospice.  A herringbone block was chosen.  I've never made one before.  The process is intriguing.

You can find the tutorial on how to make the block on the Stitched in Color website (http://www.stitchedincolor.com/2011/12/herringbone-block-tutorial.html).  We were asked to use black, orange, white, and gray.  We were also advised to add a 15th strip on to the 14 strips the tutorial discusses.  I actually ended up with 16 strips because I just kept with the pairs concept.  This will all be more understandable if you go to the Stitched in Color link above.  

I am only showing you how I came up with my block, and not trying to provide a tutorial.  Rachel at Stitched in Color does a terrific job!

So, of course, I started by gathering fabrics together. 

Oranges in a variety of values, tints, tones and prints.

Grays, blacks and whites in a variety of values, tints, tones and prints. 

Checking how they work with one another.  Wild is ok! (I guess)

All the 2" x 11" strips cut and stirred into a pile so that I can choose randomly from them.

Chain pieced pairs sewn together.

Playing around with layouts on the design wall.

 Three pairs are already staggered and sewn together.  Another pair at the bottom of the photo is ready to be added.  Note, I used a ruler to measure in 1 1/2" on each one instead of making a mark of some kind.  This kept me moving, and movement is good!  

Here you see the previously sewn together pairs flipped onto the pair with the ruler shown above.  I pinched them, picked them up, and carried them to the sewing machine and stitched the seam without pins.  This is not a precision piecing project.

My ruler is 8 1/2" wide, so to do the six inch wide cut Rachel does in her tutorial, this is what I did.  You can see the "zero" edge of the ruler at the corner one pair makes with the next and the "6" mark at the edge of the bottom pair.

The right edge of the ruler is entirely on fabric.  First cut across the bottom of the ruler.  Second, cut alongside the entire length of the ruler along the right edge.

To make the next length of ruler cut I had to shift the ruler, keeping the bottom 1/2" line aligned with the bottom edge of the block and the 6" mark on the right edge of the block. 

A two ruler method proved useful here.  (Those who know me, know that I almost always use two rulers.)  Place a ruler along the left edge of the first ruler.  Then remove the first ruler and cut along the right length of the second ruler.  If you don't have two long rulers, you can carefully spin the project around on your mat.

All the stair stepped pointy edges cut off...and of course I fogot to take a picture of just that half of the Herringbone Block.  It is the left side seen below.

One Herringbone Block completed.  I didn't mean for the rust orange to meet in the middle, but something happened...you know how it goes...A word of warning.  This is a very stretchy block, with lots of exposed bias edges, so the less you handle it the better.
See you nest Tuesday.

Tuesday, May 28, 2013

Moda Layer Cake Give Away


jill here...Many companies have been generous in sharing fabric samples.  Earlier this year, Moda Fabrics sent us some darling Layer Cake kids prints in the "Oink A Doodle Moo" collection by Jenn Ski and "Snap Pop" by Sandy Gervais.  We want to share them while they are still current!


Snap Pop by Sandy Gervais
Oink a Doodle Moo by Jenn Ski
You will be eligible to win one of these Layer Cakes (from our random generated drawing) by answering a few questions:

  • What size of baby quilt do you like to make?
  • If you have completed a baby quilt in the past year, what color scheme inspired you?  If you haven't had a chance to complete one, what color scheme would you choose.
  • When making a baby quilt do you make the design of your choice or do you let the "mom" request the design and/or fabric?
Entries end at 5 pm Central Time Monday, June 3rd, 2013.  The two winners will be announced next Tuesday.

Till then...

Tuesday, May 21, 2013

Baby Bites Free Modern Baby Quilt Pattern


Marny here...Using the Random Number generator we declare the winner of a copy of Lunch Boxes is Char!  Send us an email Char and we will arrange getting your pattern to you.    

Surprise!! Here is Baby Bites, a free modern baby quilt pattern.  We promised that we would share this a few weeks back.  It was part of our submission to the Online Quilt Magazine published in Australia.  We love this little quilt.  Maybe you remember the quilt backing tutorial Jill did a long time ago.  True to our mission, Baby Bites is a simply sophisticated design that reflects a modern aesthetic.  Asymmetry, exaggerated scale of simple shapes and negative space are all parts of that aesthetic.  

Click on this link to get to an easily printable version of the pattern.  Below is a complete set of directions as well.

Baby Bites from Modern Quilt Relish

Baby Bites is a quick and easy baby quilt any modern baby/mom would love receiving.  It measures 38” x 48”.  Simple geometric shapes are set asymmetrically on negative space. The somewhat oversized large squares feature a high contrast fabric.  These squares are clearly the focus of the quilt not only because of their size and placement, but also because of fabric selection.  The fabric is more saturated (intense) and more complex in motif design than the neighboring backgrounds. Merging the two different valued backgrounds between the squares both isolates the squares and makes them appear to float above the surface.  This added depth gives the quilt interest and an element of the unexpected.  

Fabric Requirements:  we give suggested yardage.  It is possible to piece the large background areas and save yardage, but if you purchase the suggested amounts and cut as directed you will have enough remaining to complete the back of your baby quilt.  LOF=length of fabric.  WOF=width of fabric.

Squares-Floral Focus...⅓ yard…cut an 8” WOF strip…sub cut this strip into five 8” squares.

Left Background-Medium Blue…1 ½ yards, sub cut this into:  one 22 ½” LOF strip  (will be cut later to 22 ½” x 48” or the length of your quilt) and one 3” LOF strip (sub cut this 3” strip into four 3” x 4 ¼” rectangles).
  
Right Background-Light Yellow…1 ½ yards, sub cut this into: one 9” LOF strip (will be cut later to 9” x 48” or the length of your quilt) and one 3” LOF strip (sub cut this 3” strip into four 3” x 4 ¼” rectangles).

Binding…1/2 yard (you are only using 12 ½” so perhaps you can get by with 3/8 yard)…cut five 2 ½” WOF strips.

Piecing Instructions:  Refer to the photos.  ¼” seams throughout.  Press seams open for a flat finished look.  Remove selvages.

Step 1.  Piece a 3” x 4 ¼” rectangle of Left Background and a 3” x 4 ¼” rectangle of Right Background together along their shorter edge.  Repeat three times for a total of four Step 1 units.


Step 2.  Checking the orientation in the photographs, piece a Step 1 unit to the lower edge of four of the 8" Squares.


Baby Bites full view from Modern Quilt Relish

Step 3.  Again following the photographs, piece four Step 2 units into a column.

Step 4.  Add the fifth 8” Square to the lower edge of this column.
      
Step 5.  Measure the length of your completed column.  Either cut the 22 ½” x LOF piece of Left Background appropriately and then add it to the left side of the quilt, or add first and then trim to fit.
     
Step 6.  Either cut the 9” x LOF piece of Right Background appropriately and then add it to the right side of the quilt, or add first and then trim to fit.  
      
Step 7.  Quilt, bind and savor.


  So till next Tuesday!


Tuesday, May 14, 2013

Process Promises & Pattern Give Away

Lunch Boxes, child size 

jill here....A few weeks ago, before introducing our newest pattern, I alluded to our design and fabric selections.  There are so many wonderful positive and negative fabric patterns on the market so finding ways to use them is a fun experiment.  Graphic blacks and whites with saturated colors create kid-friendly quilts.  And the asymmetrical nine patch is perfect for that intersection of transparency.  In this case, the yellow orange and the red orange intersect to create orange. The colors don't have to make accurate sense:  they could be just three fun colors that define the lines for the "gridded" appearance. Just keep in mind the values and their backgrounds.

With Spring slow to arrive, I was in a bug to create a table runner that was fresh and colorful. I discovered several fabrics from a designer that had special meaning.  At International Quilt Market, three years ago, we were given the book Scatter Joy, written and signed by artist Kathy Davis.  Her fabric line is "Happiness" for Free Spirit.  She creates wonderful water color images, often flowers with geometrics and written graphics.  This more stylized floral appealed to me.
Lunch Boxes corners. 
Lunch Boxes "opposite"... really more of a change
 in value, pattern and scale...a nice accompaniment. 

This is the small scale aqua chosen for the background.
It's directional but the pattern is written to
maintain its vertical orientation.


Mocking up choices is a good test to finalize selections.
The yellow green works well but the" intersection" fabric
and the medium value leading into it are too close in value.
This variegated stripe had just the right saturated colors.


Too many strong patterns and saturation
...took away from the emphasis.
Switched again but the light vertical was just too light.
The aqua near solid was a relief to the eye and brought in
more of the darker tones.
The yellow green vertical was again too strong
for the more subtle look I was aiming for.

Final choice:  Small scaled plaid as the vertical with the aqua
as both the intersection and medium value.  Using the aqua in
both places simplifies and reiterates the darker value.


Stitched in the ditch quilting....more later.
Ready for spring...


Into the yard.  'Till next Tuesday....
To win a copy of our newest pattern, Lunch Boxes leave a spring filled comment!  Drawing will be at 5 pm Central Time, Monday, May 20th.

Tuesday, May 7, 2013

New Pattern from Modern Quilt Relish

Drumroll please...Here, as promised, is our about to be released, never seen before pattern, Lunch Boxes.  

We love how it turned out.  Hope you do too!
Lunch Boxes pattern from Modern Quilt Relish

The yellow and gray quilt on the cover features a brand new line of fabric from Benartex.  It is called What's the Buzz from the Kanvas designers.  We used five sets of "opposite" fabrics in the blocks, a wonderful directional stripe as the background, and another print fabric that served as the "intersection" of the horizontal and vertical lines running through the quilt.  Such cute names.  Such cute fabric!!! This quilt will be in the Benartex booth at Quilt Market in Portland this month.  Again thank you Benartex!

  • Daisy Buzz, the opposite set of Yellow and Black, with Gray being the intersection fabric
Daisy Buzz Gray
This one was a good
 intersection because
 it merges the gray
 vertical with the
yellow horizontal.
Daisy Buzz YellowDaisy Buzz Black


  • Dotz, the opposite set of Black and Yellow
Dotz BlackDotz Yellow

  • Buzz Words, the opposite set of Black and White
Buzz Words BlackBuzz Words White

  • Flower Buzz, the opposite set of Gray and Yellow
Flower Buzz GrayFlower Buzz Yellow

  • Buzzy Bee, the opposite set of Gray and Yellow

Buzzy Bee GrayBuzzy Bee Yellow
  • Styx, as the background in white
Styx White


  • There are also solids in gray and yellow from Benartex
In the yellow version we kept the darker fabrics of the opposite sets at the Lunch Box corners and the lighter fabrics in the Lunch Box middles.  The dark blocks are on a light background.  The dark solid runs vertically in this quilt and the lighter solid runs horizontally through the lighter Lunch Box middles.

The pattern makes four sizes; Table Runner, Baby, Child and Throw.  It is written to take into account the incredible backgrounds you find that are directional fabrics.  Hooray!  If you don't want to use a variety of opposite sets the pattern is also written for all sizes using just one set of opposites as pictured in the Child size quilt on the cover.

We will begin shipping patterns Monday, May 13.  

Next week we'll be discussing the fabrics in the Child size quilt, and why they were chosen.  We always like to learn and teach from our own experimentation.  Not to mention, give away patterns!  Yep, pattern giveaway announced next week.

Till then....