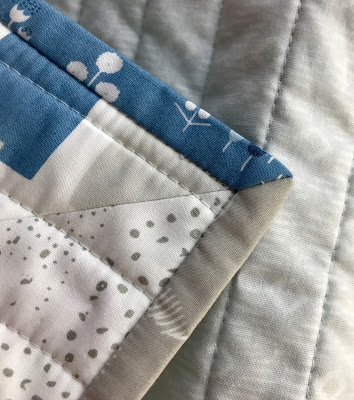
Marny here...I recently made a baby quilt using a blue, aqua, and gray collection of Lagom Art Gallery fabrics. I tested scrappy binding, solid binding and a print binding. None of them supported the layout of color within the quilt. I really wanted one color for two opposite sides and another color for the remaining opposite sides. In steps serendipity!
I'd asked Penny at a recent Des Moines Modern Group meeting who some of the best teachers in our area were. She named Linda Hungerford (although Linda now resides in Florida), mentioning that many beginners she had taught were now accomplished quilters. She then specifically reminded me of Linda's binding technique using machine sewn mitered corners. It is well detailed on her blog here. Lightbulb moment...if I used Linda's tutorial I can change fabrics at the corners without guess work. Using the new (to me) techniques allowed me to place a mostly blue print on two sides and a mostly gray with aqua print on the remaining two sides.
 |
| I used 2 1/2" strips, pieced diagonally as I usually do, to bring them up to the recommended length. |
 |
| I just matched my process to Linda's photos and worked my way through the tutorial! |
 |
| Checking how the mitered corners are going to look |
 |
| I stitched right next to the seam from the right side of the quilt the way I usually do. |
 |
| Gotta say this looks pretty good from the back |
 |
| Mitered corner from the back. All sewn up and no hand stitching required! |
We hope those of you within shopping distance plan on attending Lucky Star Market December 2nd and 3rd. It is great fun choosing which quilts we'll be selling. More pictures of vendors etc on their Facebook posts. We can't wait to do some shopping ourselves!
Till Tuesday....


Perfect! I have a quilt ready to go and wanted to bind it this way but didn't know how! Thanks for the timely post!!
ReplyDeleteGlad it came along at the right time for you too!
DeleteWow. I have not seen this technique before. Thanks for sharing Linda's tutorial link and your beautiful finish!
ReplyDeleteThank you! Hope you get a chance to try it soon!
DeleteWow! I must have missed that post from Linda! I follow her faithfully and have seen her quilts in person while in Florida. Her work is wonderful! Thanks for sharing this post and tag to her binding tutorial!
ReplyDeleteGlad you got to see Linda's quilts in person. She does beautiful work indeed.
DeleteThanks for sharing!
ReplyDeleteYou are welcome! Thanks for taking a look!
DeleteWhat a neat technique! I'll have to try this.
ReplyDeleteThe back of your binding looks great, with very even spacing on the back binding's edge stitching. I machine bind the opposite way: sew binding onto the back first, then edge stitch from the front so I can see the spacing. I've gotten good at making it even, but it still looks like edge stitching instead of invisible ditch stitching. Sigh. Any tips on how not to wobble around where you can't see the stitching?
This comment has been removed by the author.
DeleteHi Louise. Maybe take a look at the posts that our "binding" and "binding tutorial" labels (listed on the right side of our blog) bring up. Hope there is something there to help you!
DeleteI always feared a scrappy binding when it came to corners. This is a brilliant method...Thank you for sharing it, I'll be giving it a try!
ReplyDeleteHope you try it and like it!
DeleteIt looks wonderful....but I don't get it, lolol. Duh. Is there a video on this. I do better with videos, lolol
ReplyDeletebeautiful binding and quilt too!
It is easier to understand while actually working on it. You might take some leftover binding scraps and just try it on a fabric square. Linda also did a webinar for the Modern Quilt Guild if you have access to those.
DeleteAwesome! Everything about this is perfect. Your finished binding is my goal for bindings. Thanks for the info and I'm going to check out your binding tutorials to help me improve my technique.
ReplyDeleteThank you Sam!
DeleteWhat a great result..I'm keen to give this a try so thanks for the link :-)
ReplyDeleteLearning something new (and maybe better or more useful) is always fun!
DeleteI know people have down this, and with my perfectionistic tendencies, I probably would not have tried it without this wonder post. Now, I have a great example. That gives me confidence. TY TY TY
ReplyDeleteThank you Suze! Good luck.
Delete